I cruised the net and landed at one of my favorite spots of "cool" stuff, Watson's Streetworks. I noticed they had a link to the category brake switches/relays so I thought I'd check it out.


When I received the switch, I discovered it was much smaller than I had expected...this is good!. I then placed it in several different positions near my brake pedal (after determining where "off" and "on" were on the switch) and decided on a mounting point.
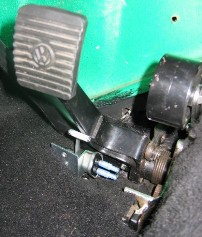
It seemed that on the floor, behind the brake pedal (toward the rear of the buggy) would work best. I found a piece of angle (2" x 2") and mounted the switch to it, then mounted it to the floorpan. The 2 x 2 angle worked out well because I was concerned about hitting the switch with my heal while driving. The angle bracket allowed me to mount the switch low and give a good 3/4 to 1" of bracket above the switch. Now all I had to do was adjust the arm.
The switch is made with an adjustable arm and a nylon roller that comes off the arm at 90 degrees. This roller rides on the brake pedal arm.
All that was left was wiring the switch into my harness which turned out to be simple enough. On the VW 3 wire system, the black and black/red wires from the harness to the connectors on the master cylinder are the wires you want to use. The third wire is for the low brake pressure warning light. The black wire goes to one side of the new switch and the black/red to the other. The whole thing works like a champ and is very easy to install. The most difficult part of the install was adjusting the switch's arm to allow contact at the right point. Two hands were almost not enough. In fact, once I determined the point, I got a landscaping block to hold the brake pedal down. This allowed me to freely work on the arm and tighten down the adjusting screw and nut.
So if you use the stock hydraulic pressure switches for your brake lights, check them out. Make sure your brakes lights come on when you step on the pedal. Good luck and safe driving!
