Greaph's introduction to air cooled buggies UPDATED 4/30

Show us your project. In progress or finished!

Moderator: Ken

Greaph's introduction to air cooled buggies UPDATED 4/30

Postby Greaph » 29 Tue Apr, 2008 1:52 pm

First things first, Hello to everyone, I am glad that some members found me at Samba and pointed me here :-). I am a fluid engineer by trade (I work in oilfields worldwide) and consequently, have weeks at a time to work on my projects and play ;-). I have been building track and street rods since the age of 7 (well....I HELPED), and have also built numerous 4x4 trucks and 3 show vehicles. My current baby is a 1965 Toyota Landcruiser FJ-40.

Now...on to the reason I am here. I was recently at a friends house helping clear out a bunch of junk from the yard, and i saw a fiberglass buggy that brought me back to watching Speed Buggy as a child. This was the first I had seen since the seventies. Apparently, he had picked it up and did a partial (and very sloppy) restoration on the buggy, but had stopped due to lack of funds/interest. His idea of restoration was to paint it woodland camoflage (on top of blue metallic flake....not even sanded), put in a schedule 40 show cage, and rewire it without a single relay, and only 4 circuits........

But, it did run, after a fashion, and I had a blast the first time behind the wheel, so i bought it.....my VERY FIRST air cooled engine...my very first dune buggy. It has been nothing but fun since :-).


I have no "before" pics (never thought about it), but I have many of the ongoing restoration:
All holes filled and bad glass cut out and replaced. Body off and last coat of primer (2 coats Poly-fil, 3 coats hi-fil, and 2 coats finish primer..

Image

Image

Image

After clearcoat (Hot Shots, Lime Green with pearl)

Image

Image

Image

While the body is off, I replaced both pans with 1/8" diamond plate, and ran a 1"x2" perimeter channel. I also ran boxed the diamond plate floors with 1"x2" channel. I trashed the schedule 40 show cage, and will build a roll cage from 1 1/2" dom .095 wall.
Last edited by Greaph on 30 Wed Apr, 2008 9:31 pm, edited 1 time in total.
This IS my sig......
User avatar
Greaph
Buggy Nut
 
Posts: 88
Joined: 28 Mon Apr, 2008 6:52 pm
Location: San Antonio TX

Postby Greaph » 29 Tue Apr, 2008 2:02 pm

I have also built structural rock bars, removed the stock pedal assembly, lowered the seat brackets while retaining the sliders 2". I built rear bench supports, and boxed in the tranny to hopefully eliminate wheel hop.

Image

Image

Image

Image

Image

Test fitting body after chassis modifications..

Image

Image

Image

Image

Image

Image

Image

Image

Image

I have a new 2176 waiting to go in it. Once this summer season is over, I will be installing dual A-arm front suspension, a long travel IRS (hopefully 5 speed), and the 14psi turbo and intercooler I have sitting here :-).

Any suggestions, advice, and creative criticism will be gratefully considered (this being my first buggy)...

Thank you for your interest :-), I will continue to update as I make progress.
This IS my sig......
User avatar
Greaph
Buggy Nut
 
Posts: 88
Joined: 28 Mon Apr, 2008 6:52 pm
Location: San Antonio TX

Postby CoryN » 29 Tue Apr, 2008 2:29 pm

Glad you found us. Looking good!

Cory
CoryN
Buggyholic
 
Posts: 1108
Joined: 30 Wed Jan, 2008 12:11 pm
Location: McKinney, Texas

Postby Don » 29 Tue Apr, 2008 2:29 pm

I have a new 2176 waiting to go in it...and the 14psi turbo and intercooler...Any suggestions...


:shock: :shock: :shock: Some really good brakes :lol:
User avatar
Don
Buggy Nut
 
Posts: 180
Joined: 06 Mon Aug, 2007 7:55 pm
Location: Pearland

Postby CoryN » 29 Tue Apr, 2008 2:31 pm

Where did the "Missouri Chrome" go? ;-)
CoryN
Buggyholic
 
Posts: 1108
Joined: 30 Wed Jan, 2008 12:11 pm
Location: McKinney, Texas

Postby Greaph » 29 Tue Apr, 2008 6:43 pm

CoryN wrote:Where did the "Missouri Chrome" go? ;-)


LOL, I had to remove the "Missouri Chrome"......I found that it would conflict with installation of and operation of the clutch....

My son was heartbroken when I removed his contribution

Image

here you can see the Missouri Chrome in it's original placement.
This IS my sig......
User avatar
Greaph
Buggy Nut
 
Posts: 88
Joined: 28 Mon Apr, 2008 6:52 pm
Location: San Antonio TX

Postby CoryN » 29 Tue Apr, 2008 7:17 pm

:D 8-)
CoryN
Buggyholic
 
Posts: 1108
Joined: 30 Wed Jan, 2008 12:11 pm
Location: McKinney, Texas

Postby Greaph » 30 Wed Apr, 2008 9:36 pm

Completed the chassis....finished the seat mount fabs, the rock bars, built the rear seat/tranny supports, painted and did the rear brakes.....also picked up 2 sets polished slotted wheels one in 14" one in 15", 8" fronts, 10" rears. OH, and some awesome (for me anyway) rear tires!
Pics:

Image

Image

Image

Image

Image

Image

Waiting on the wiring harness (gets here on the 2nd), installation of the 2176, and cage, front, and rear bumper fab.
This IS my sig......
User avatar
Greaph
Buggy Nut
 
Posts: 88
Joined: 28 Mon Apr, 2008 6:52 pm
Location: San Antonio TX

Postby Aquabuggy » 30 Wed Apr, 2008 9:45 pm

Now thats my kinda buggy BIG tires, lime green paint, oh yea.
My name is Chris and well I'm a buggy-aholic

04 Aqua buggy - sold
72 Orange buggy - sold
72 Green longbody - aka Shrek http://texasmanxclub.com/bboard/viewtopic.php?t=1082
68 Manx - viewtopic.php?f=11&t=2509
User avatar
Aquabuggy
Buggyholic
 
Posts: 942
Joined: 02 Sun Oct, 2005 10:18 am
Location: Victoria Tx

Back at it, after a long break.....

Postby Greaph » 05 Wed Nov, 2008 11:57 pm

Well, as the title says, I am back at it after a very long break due to work....The good news is, money isn't much of an issue now :-). Still, I'd rather have finished it sooner so I could enjoy it now.

I pick up the 2300cc engine Friday, and various other parts, new exhaust, clutch, tinware, fan-shroud, etc. That will go in this week. Then its off to TexasBuggies' place (his schedule permitting) for a complete cage.

Other plans are 4 wheel disks (I think the turbo 2300cc will pretty much require those) and dual front a-arms and 3x3 semi trailing arms (will have to wait for the new tranny first....as soon as I wreck the one I have :P).

To date, I have completely rebuilt the floor/frame (3/4x2 channel, and 1/8 diamond plate floor, only re-used the tunnel), build rock-bars, fixed all the cracked/rotting glass, sealed/primed/painted the body, installed a new 20 circuit wiring harness (I know....overkill), new lights/ignition system and done a lot of drooling/dreaming of completed projects.

Any advice, help, flames, offers of ideas and or parts appreciated (I may even pay for parts :P)

Sorry about my extended absence, but I preferred not to beat myself over the head with your beautiful rides when I couldn't even wrench mine.
This IS my sig......
User avatar
Greaph
Buggy Nut
 
Posts: 88
Joined: 28 Mon Apr, 2008 6:52 pm
Location: San Antonio TX

Postby Don » 06 Thu Nov, 2008 9:18 am

Hey Greaph,

I have a buggy body that I'm pretty sure is the same as yours. It was made by Fiberglass Products Inc in Houston and was called a Spyder.

Image

Image

Image
1967 Dune Buggy - aka Shrek
User avatar
Don
Buggy Nut
 
Posts: 180
Joined: 06 Mon Aug, 2007 7:55 pm
Location: Pearland

Postby freightshaker » 06 Thu Nov, 2008 11:09 am

interested in getting rid of your old wheels? If so let me know

Jerry
69 manx style buggy(clod hopper)
67 bug
67 Ghia
65 volksrod
69 bug
03 Chevy Tahoe
81 Dodge Prospector
92 Chevrolet Z71
User avatar
freightshaker
Buggy Driver
 
Posts: 34
Joined: 08 Wed Oct, 2008 11:01 am
Location: Sherman, Texas

Postby Greaph » 06 Thu Nov, 2008 1:24 pm

Don wrote:Hey Greaph,

I have a buggy body that I'm pretty sure is the same as yours. It was made by Fiberglass Products Inc in Houston and was called a Spyder.


Sweet!! I am soo glad you posted, I have long been curious as to which clone mine was. The usual sources of info didnt help me identify which manufacturer made mine.

Yours looks much nicer than mine did in the rough :-). I hope you have as much fun restoring it that I am with mine.

Any assistance I can provide, you can only have to ask :-)
This IS my sig......
User avatar
Greaph
Buggy Nut
 
Posts: 88
Joined: 28 Mon Apr, 2008 6:52 pm
Location: San Antonio TX

Postby Greaph » 06 Thu Nov, 2008 1:26 pm

freightshaker wrote:interested in getting rid of your old wheels? If so let me know

Jerry


Jerry, I am afraid that if I dont use them, they are spoken for. A friend of mine with a sand rail really wants them :P
This IS my sig......
User avatar
Greaph
Buggy Nut
 
Posts: 88
Joined: 28 Mon Apr, 2008 6:52 pm
Location: San Antonio TX

Postby Greaph » 07 Fri Nov, 2008 9:29 pm

Today, knowing my engine will be completed in the next few days, I decided to start something I've been putting off for quite some time.....wiring. Having rewired several 4x4 trucks, jeeps, Toyotas, and various Hot Rods, I REALLY wasn't looking forward to it. Having routed most everything now, I wish all vehicles were as easy to work with :-)

I started collecting parts for the rewiring late December of 2007. I purchased the buggy (which I now know is a Spyder, by Fiberglass Products Inc., of Houston) in October of 2007 with the intention of just getting the engine running reliably, and having lots of fun in mud, sand and whatever (ROFL). While trying to get the components to play nicely (nothing wanted to work) I realized that what it really needed was a new harness (among MANY other things). This is, once again, my first VW, much less my first buggy.

So, before long, I had decided to fix the fiberglass, replace the engine with a 1914 stroker (that lasted all the way until I actually spoke with the builder...somehow I walked out having paid for a 2276 stroker, with 8.4 to 1 compression, so I can turbo it :-) ), the tranny with a 002 (still working on that), fresh paint, wiring, and full cage. So went my initial plans of a 2000$ or less fun toy.......

Anyway, back to the wiring:
I started with a "It's a Snap" wiring harness purchased from EBAY for 120$. The harness itself is a 20 circuit harness (plenty of room for expansion, should I install power windows, etc :P). I also sourced a ground bus bar, and a few hundred waterproof splices, connectors, and plugs and switches. The harness came fairly complete, however the documentation is horrible. I do not recommend it to anyone that knows nothing about electrical systems, or does not have a friend to help (that having been said, I am available to anyone that needs any help).
This IS my sig......
User avatar
Greaph
Buggy Nut
 
Posts: 88
Joined: 28 Mon Apr, 2008 6:52 pm
Location: San Antonio TX

Postby Greaph » 07 Fri Nov, 2008 9:56 pm

The first thing I did was think the entire install through. How it would run, how it would be secured, etc. I wanted everything to be run high, mounted as securely as I could manage, be watertight (submersible), and look good. This toy WILL be played with. So, I decided to install a 3.5' long 1"ID PVC pipe on each side of the buggy, under the side lip. Another goal of the wiring plan, is to be able to remove the body from chassis, having only to disconnect the main power, coil, Alternator exciter, and main ground wires.

Here are the PVC pipes:

Image

While they are drying, I installed the fuse block. I thought long and hard (2 months), about where I would place the fuse block. I even drew up plans for a fuse panel the dropped down from under the dash. However, I decided in the end to just fasten the block to the firewall, and free up space for other things (you will see what things in the future).

Image

Image

Image

Image

Then I started separating wires, based upon where they would be going (as an aside, the "It's a Snap" harness wires are printed along their entire length with the name of the component they are meant for), and then installing protective wrap on the separated wires:

Image

Image

Image

As a section was completed, I tie-wrapped it out of the way. In the interest of secure mounting, and even ease of expansion, I decided to (sob) drill some holes for tie-wraps in places where they don't show, of course, instead of using a 3M backed attachment block for the tie-wraps (which can, and do, pull off):

Image

Image

Image

Image
This IS my sig......
User avatar
Greaph
Buggy Nut
 
Posts: 88
Joined: 28 Mon Apr, 2008 6:52 pm
Location: San Antonio TX

Postby Greaph » 07 Fri Nov, 2008 10:17 pm

Then I installed the 2 PVC pipes beneath the side lips. They are not currently glassed in, I will do this when I take the body back off to build the 2" body lift (my next little project). Once the pipes were in, I routed the wire through the passenger side, to the rear of the vehicle:

Image

Image

Image

Image

Image

That done, I cut, soldered, and sealed some common grounds for the taillights, backup lamps (actually, I think those will go to a switch, and just be rear mounted trail lights), and the 3rd brake line.
Then I moved to the interior of the buggy, and school being out now, I commandeered some slave labour (hey, this is supposed to be a family project :P) :

Image

Image

Image

Image

I also actually made my son work :P. We routed the interior wires, and broke them out into 3 separate bundles (this was done for future ease of upgrade. I currently am using a junk steering column and one of those "replacement" turn signal switches-the type that clamp on. Once the dual A-Arm front end has been put in by me, I will be installing a Flaming River polished tilt column to hook up to the Golf box). We also installed the ground bus, relays, hazard and signal flashers. :

Image

Image

Image

Image

Image

Image

This was all that we accomplished today, as it quickly grew too dark to work (I have a workshop on the other side of my town, but if I want my son to help after school, working there is troublesome).
Anyway, I am one step closer to driving it around- there are many things left on my to-do list, but most of them can be done after I am driving it. Once I have it on the road, I need to stockpile the parts to install the turbo, intercooler, fuel injection (I am still considering this), and whatever else I think of....hopefully not much else for a while, my '65 Landcruiser FJ-40 needs some TLC...as does my toy hauler.

P.S.- anyone know where I can source a windshield rubber? The part the goes between the windshield and the hood.

Thank you for your patience with my rambling :-)
This IS my sig......
User avatar
Greaph
Buggy Nut
 
Posts: 88
Joined: 28 Mon Apr, 2008 6:52 pm
Location: San Antonio TX

Postby Bill K » 08 Sat Nov, 2008 10:23 pm

Bug Shields for the windshield rubber. He's one of our great sponsors.
Dream It - Plan It - Build It
User avatar
Bill K
Buggyholic
 
Posts: 2168
Joined: 06 Thu Oct, 2005 8:08 am

Postby Greaph » 08 Sat Nov, 2008 10:35 pm

Hmm, for some reason my server rejected his email address...

*edit* If at first you don't succeed......try the work server....

I was able to contact him, thanks for the info
This IS my sig......
User avatar
Greaph
Buggy Nut
 
Posts: 88
Joined: 28 Mon Apr, 2008 6:52 pm
Location: San Antonio TX

Postby Greaph » 03 Sat Jan, 2009 10:23 pm

Hmm, it's been a while since my last post, but I kept pics of my (most of it, anyway) hard work.

Between being at work MOST of the last 4 months (there was a period where I was home for all of 3.5 days out of 9 weeks) and the holidays, I don't have as much to show for my time as I wished.....

Anyway, I left off with running the wiring. During this, I had an idea (admittedly, as almost all my good ideas, I unabashedly plagiarized it from someone else's build, If I remembered your name, you would certainly receive due credit here:P) for an under-dash speaker pod. Being (of course) too good (too cheap) to go and buy a marine speaker pod from a marine vendor, I decided to fabricate it myself. So, pride and wallet in hand, off to the hardware store we go. One hour later, with 3 sheets of glass mat, 2 cans of resin, 2 6" lawnmower wheels and some cardboard, I start fabricating-

First I made the form from the aformentioned lawnmower wheels, and cardboard. I then covered the cardboard with duct tape and smeared it with release agent (vasoline :P) and mounted the form to a spindle, like so-

Image

Image

Now armed with spindle mounted form, let the fabrication begin with the application of resin impregnated woven glass!

Image

Image
The spindle make the work much easier. Once the desired thickness is obtained (in my case, just 3/32", after sanding, I wanted the speakers to have a "looser" sound), and the glass is dry (make sure you work any extra resin or air pockets out!!), cut the edges and make them uniform and flush. After completing this, you are ready to release the form.

Image
Image

Image

Aren't you glad you used release agent? :P

Then I cut out 2 speaker mounts from 1/2" plywood I had laying around, and glassed them into the inside, flush with the lip of the enclosure-

Image

Using 2 of my wife's flower pots (the plastic kind), I drilled the hole in the center of the enclosure, ran the wires, then inserted the wires through the flower pots, and sealed the holes in the bottom of the pots. Having done so, I filled the center of the enclosure with expanding foam, let it dry, and removed the flower pots-

Image

Image

Image

Almost done!! I then painted the enclosure with "Wrinkle Paint", let it dry, and installed the speakers. Not being able to help myself, I had to hook it up and give them a listen! They sounded extremely nice, just a tad sloppy below 80Htz, but that is more a function of the speakers (6" mid-range drivers) than the enclosure. I was very happy with the end results!

Image

Having completed this, the first time I have used fiberglass as a speaker enclosure, I don't think I will be doing it again. It IS much easier to form than any other medium I have worked with (plexiglass, wood, plastic, and particle board), but it was extremely time consuming. The building of the form, glasswork, and sanding took 12 hours. The wooden rings and glassing them in required another 2 hours. I am glad it is complete :P
This IS my sig......
User avatar
Greaph
Buggy Nut
 
Posts: 88
Joined: 28 Mon Apr, 2008 6:52 pm
Location: San Antonio TX

Postby Greaph » 03 Sat Jan, 2009 11:23 pm

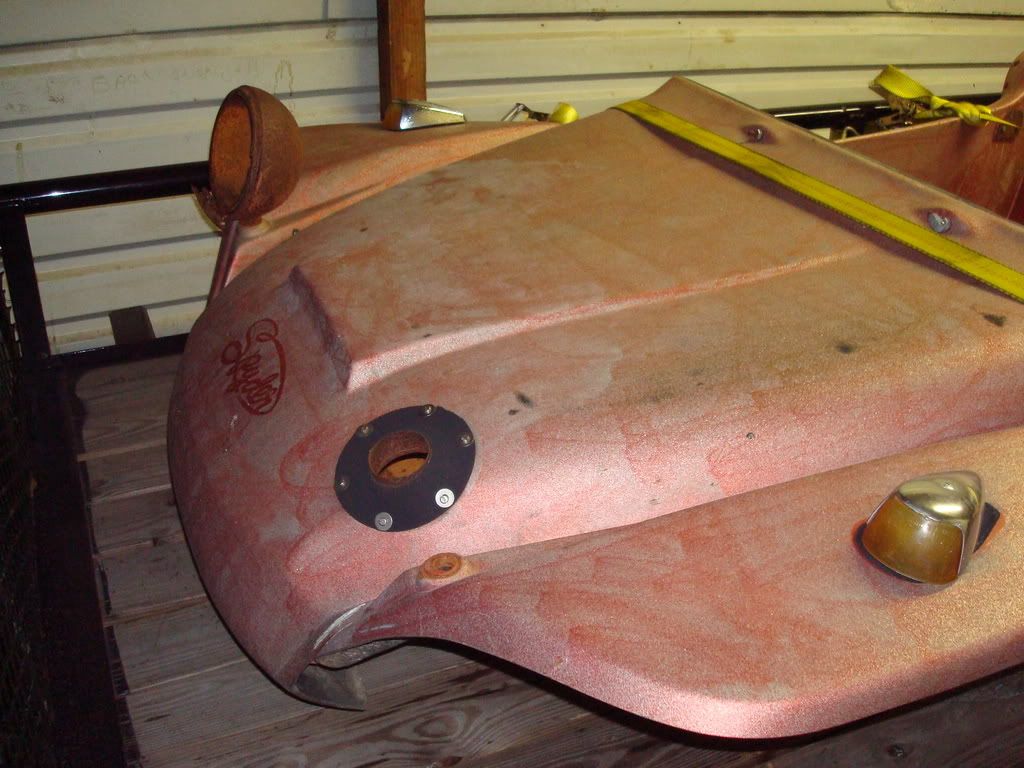
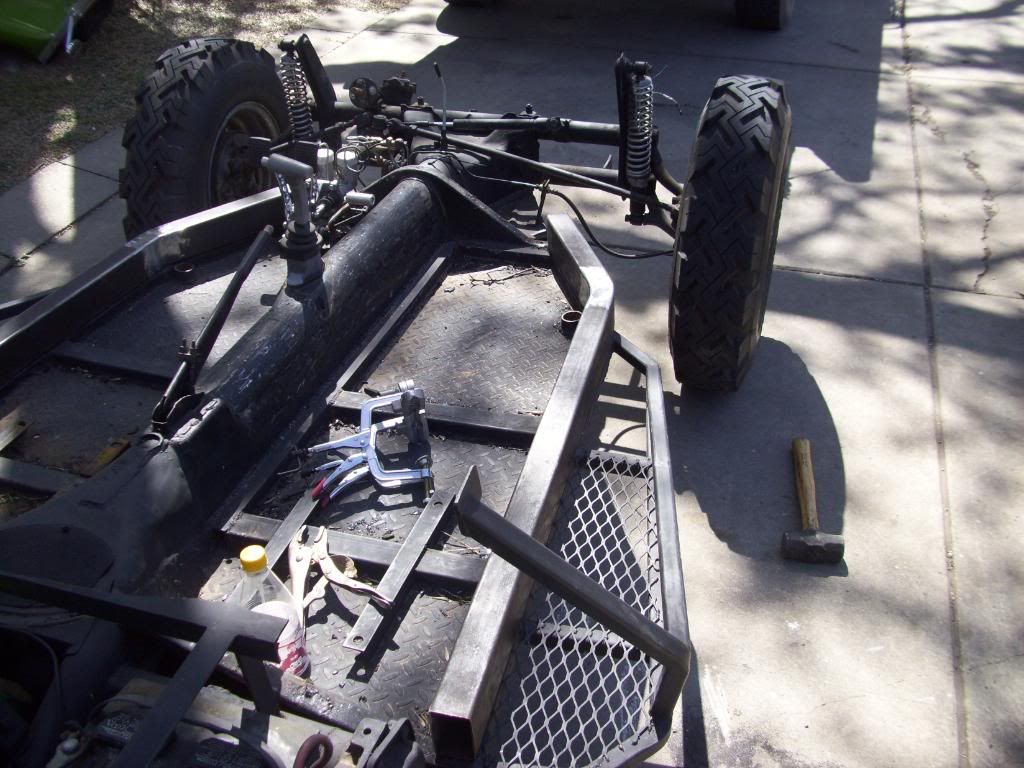
After that project, I wasn't able to do much for a few months. Finally back at home, time for the engine! And many, many, many small little "details" that seemed to be overlooked until I put the engine in.....Like fuel line routing, ignition, oil filtration and cooling....not to mention fabbing mounts, brackets, and doo-hickeys for all these things (nothing you guys have run into before, I'm sure :P.

Time for a little aside, because, I'm sure I will be flamed for the placement of a few of my doo-hickeys. I've put a lot of thought into this, and what and how the buggy will be used. It will be hurt fairly often, and driven very hard over many different types of terrain. So, I came of with a few "rules" for the build of this, my first dune baggy, and first VW.

1- Chassis, running gear, and engine/engine components stay together.
2- Body, electrical, etc stay together.

What this means is, when I remove the body, (after dissassembling the cage, of course) I only want to have to disconnect a few wires (alt, battery, and engine leads, remove the body bolts, and voila! Body comes off. I also don't want to have to start mounting things to the rear portion of the cage (mainly engine electrical, etc). So, these rules have made some compromises necessary. Please, before you flame me, keep this in mind. HOWEVER, should you see I have made a GLARING or dangerous error, feel free to let me know, in whatever manner you choose! Thank you :P

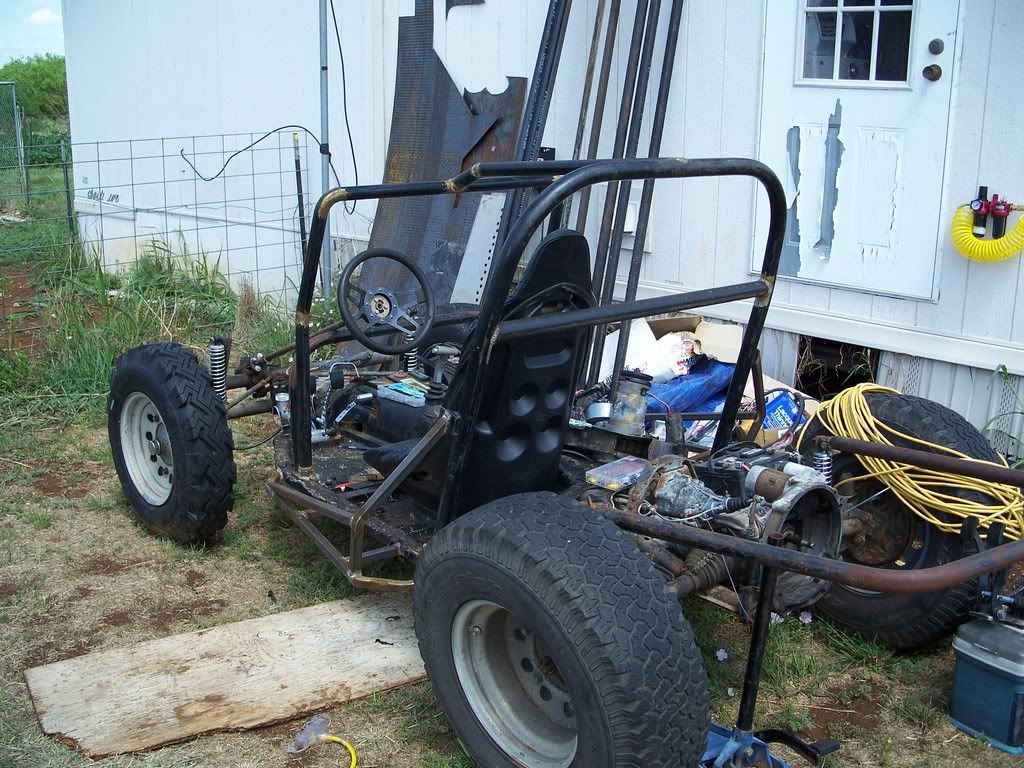
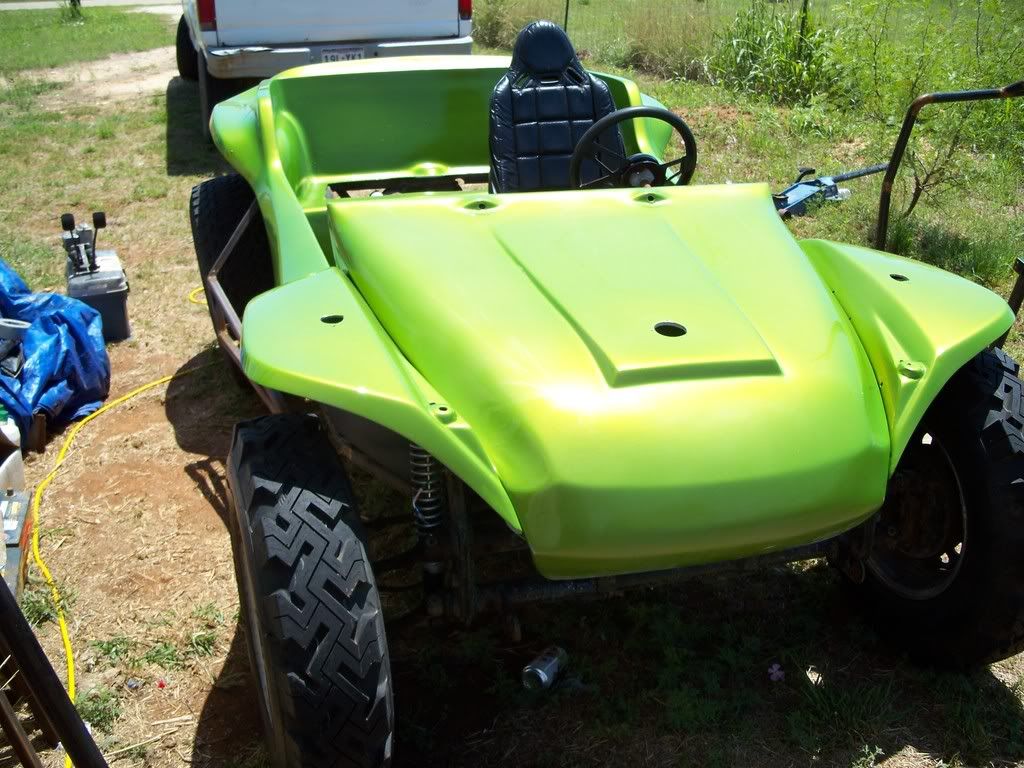
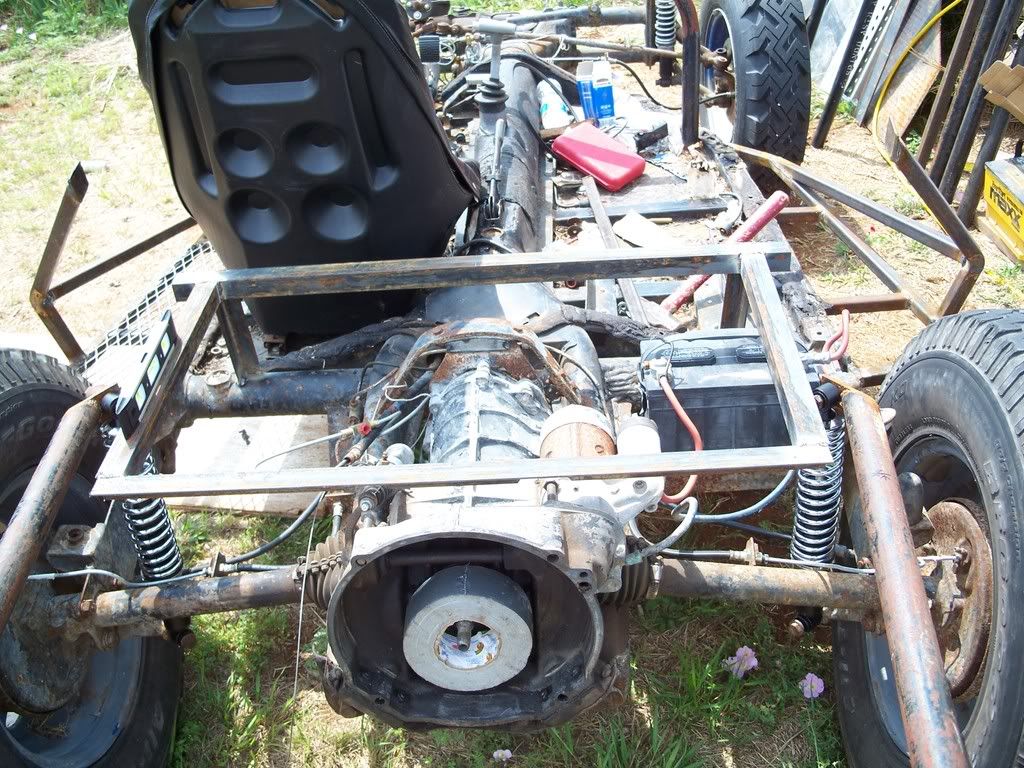
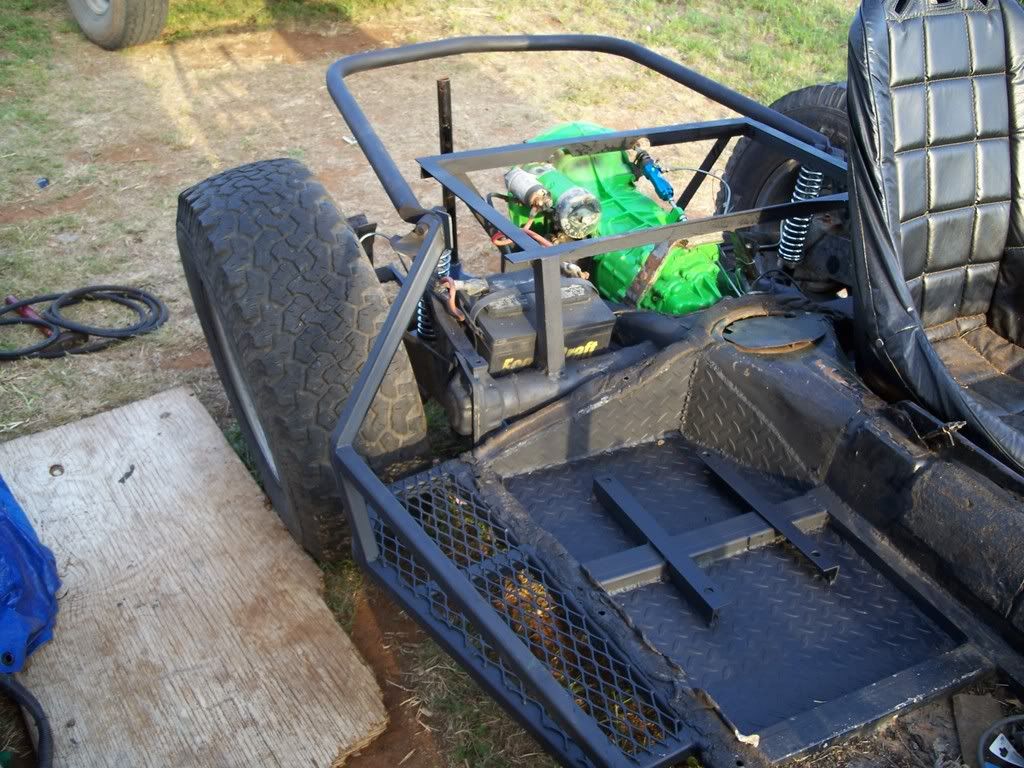
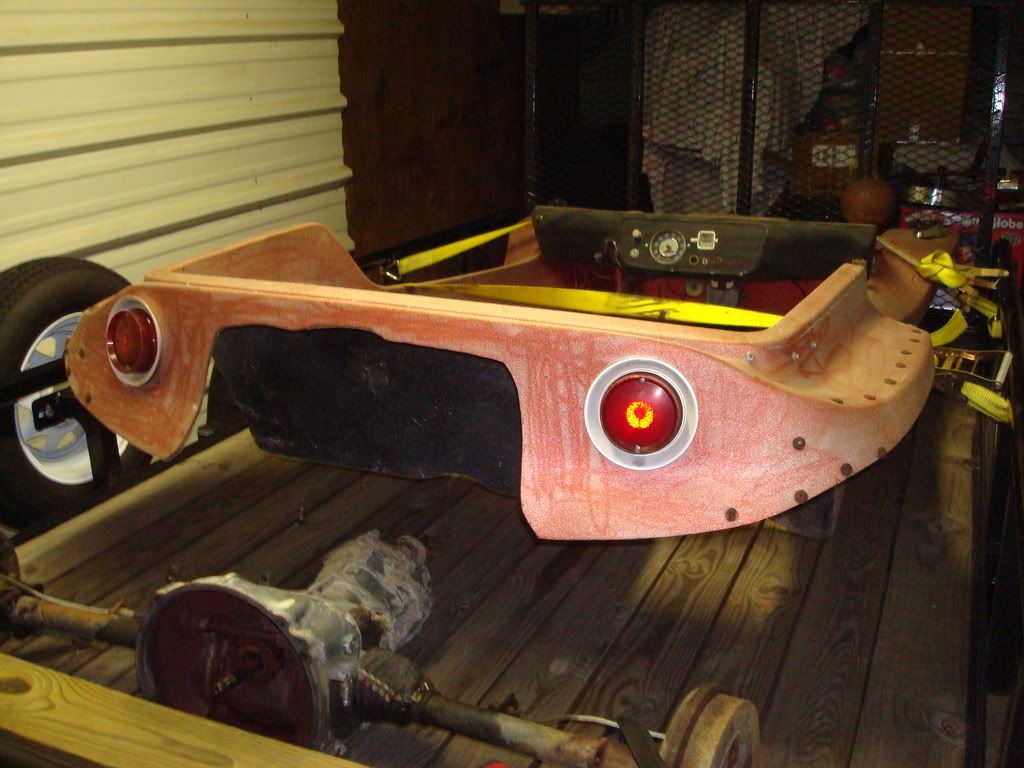
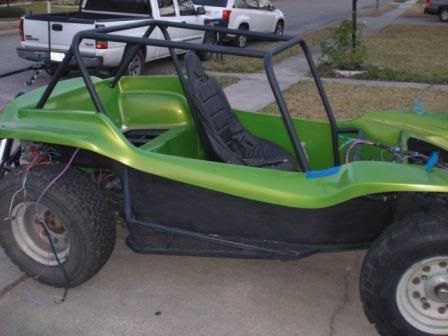
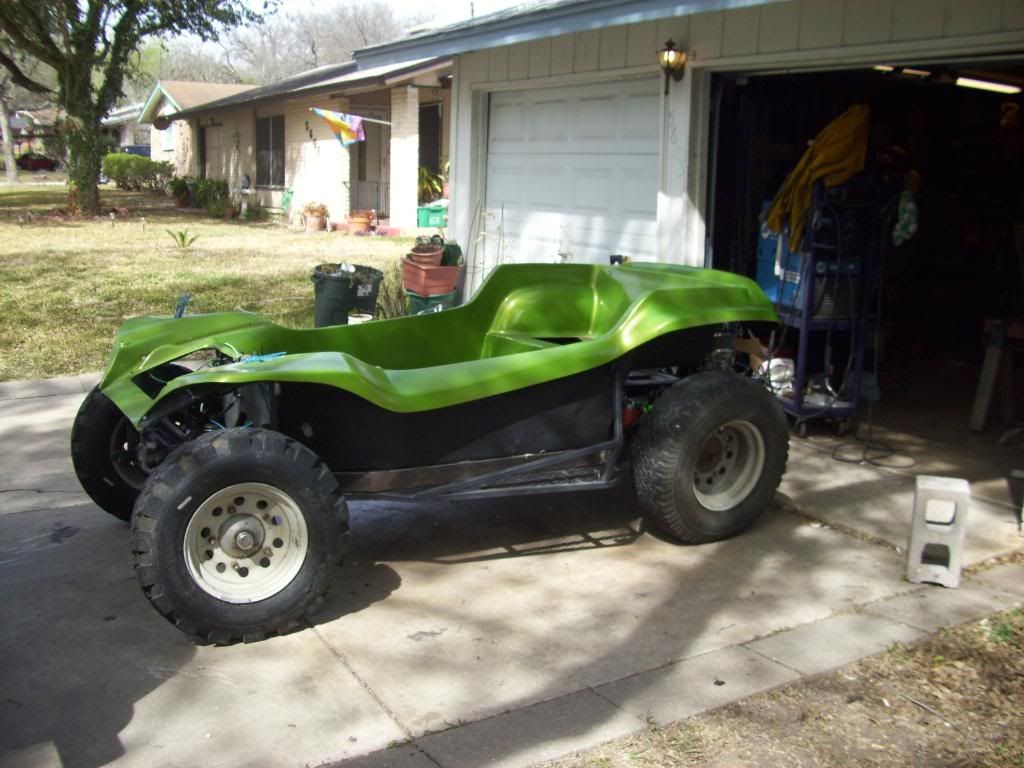
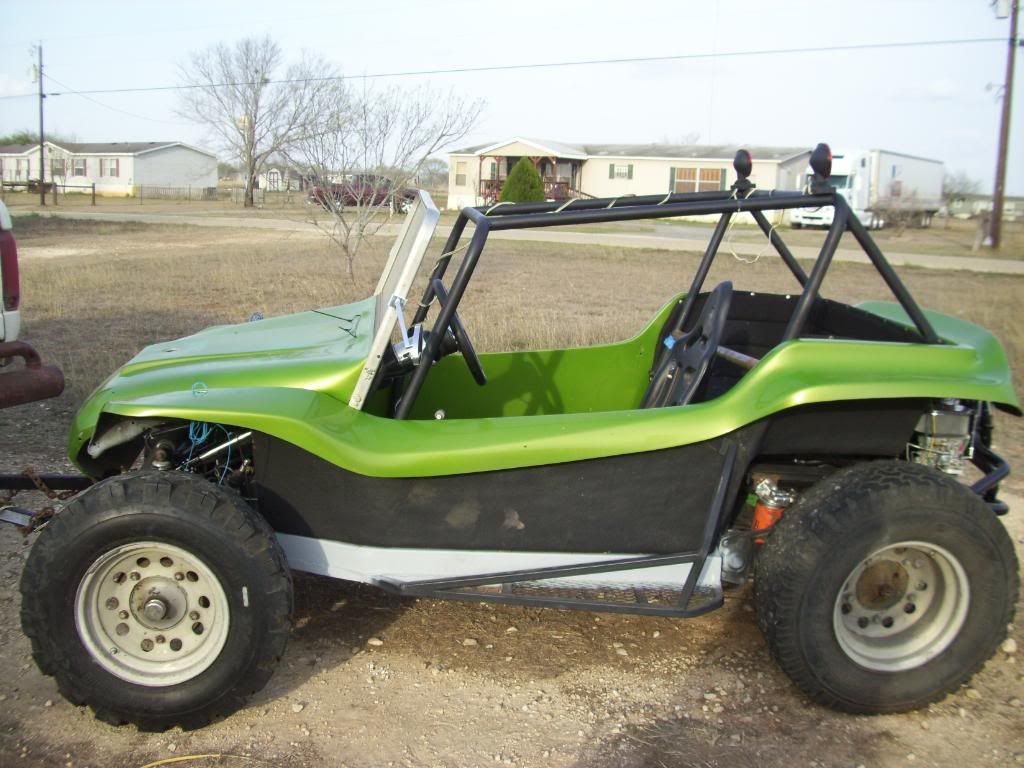
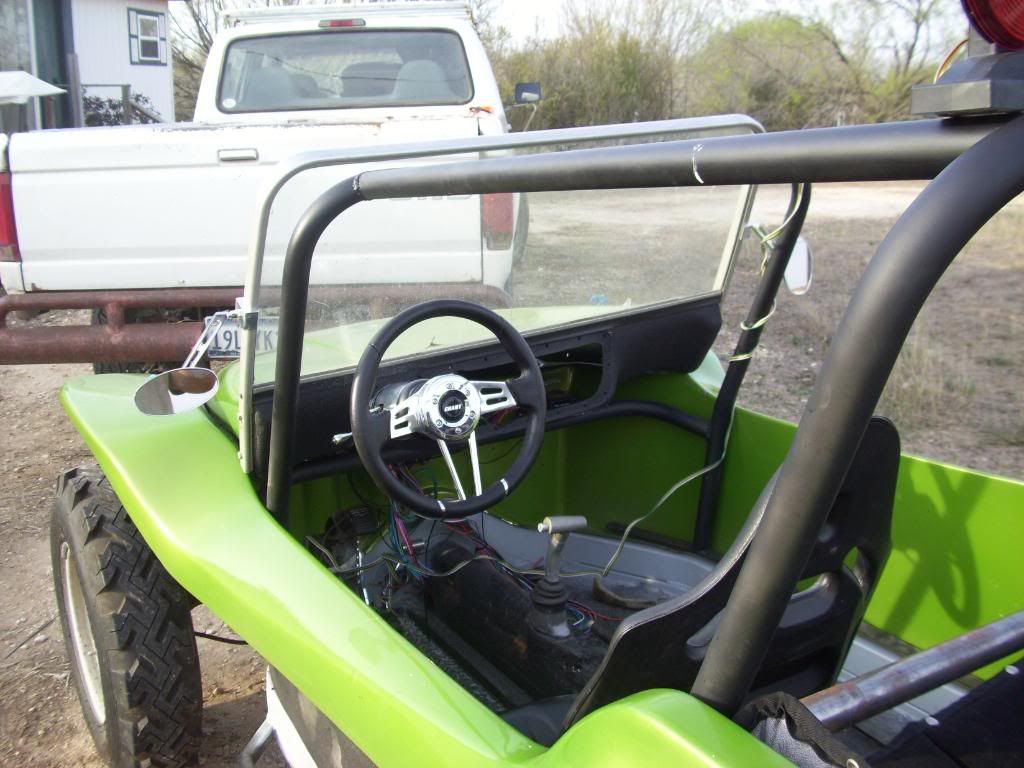
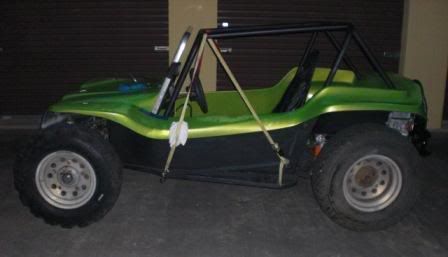
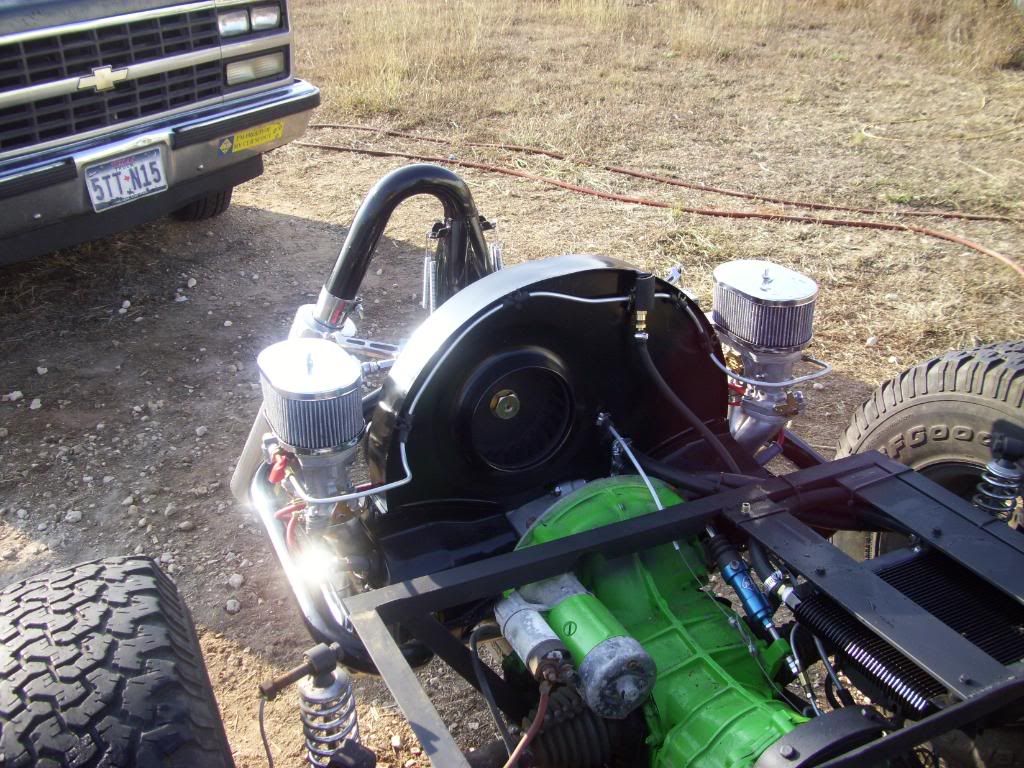
OK, here the heart of my beast-

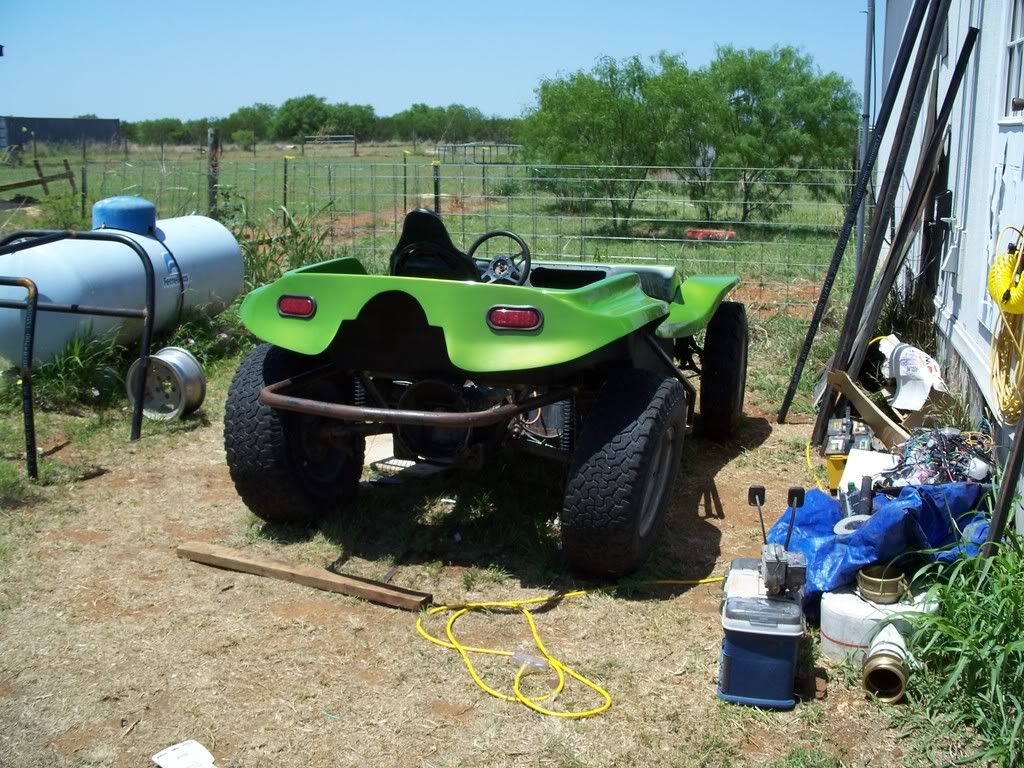
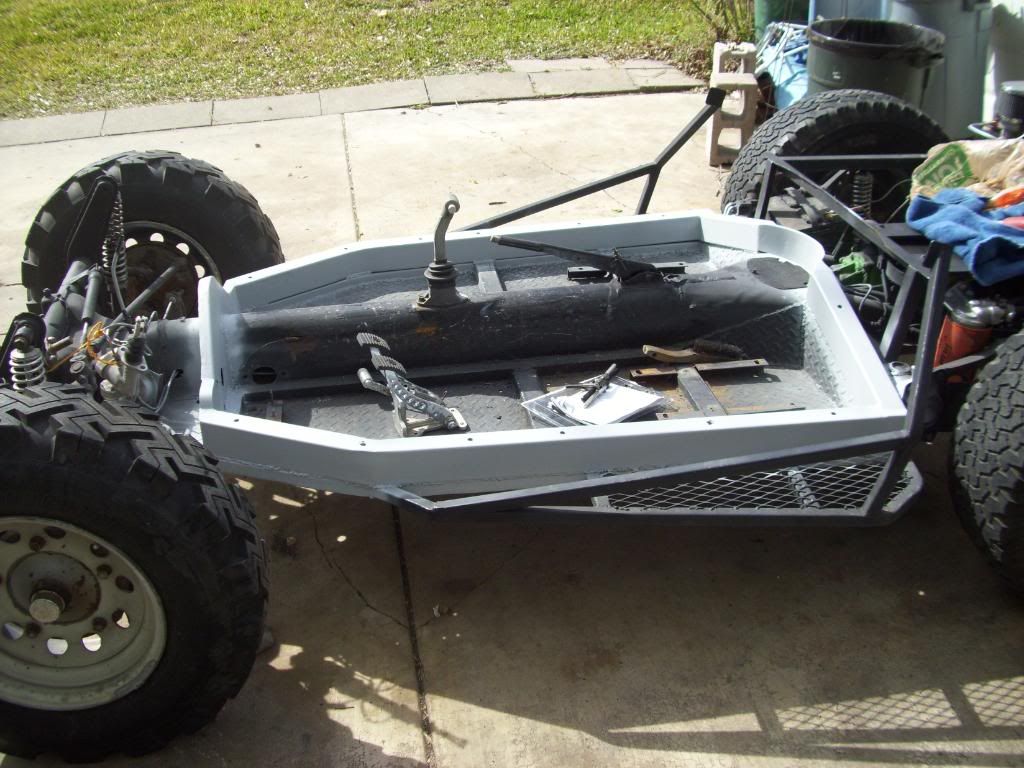
2276cc, with 5.5 I-beam rods, 40x35 heads, and cam changed to Engle VZ-25. Currently NA with 2xWeber 44's. I am fairly certain this will change next winter when I install the turbo, and go to either mechanical or electronic port injection. However, she is NA now, and here she is in the buggy, at long last-

Image

Image

Image

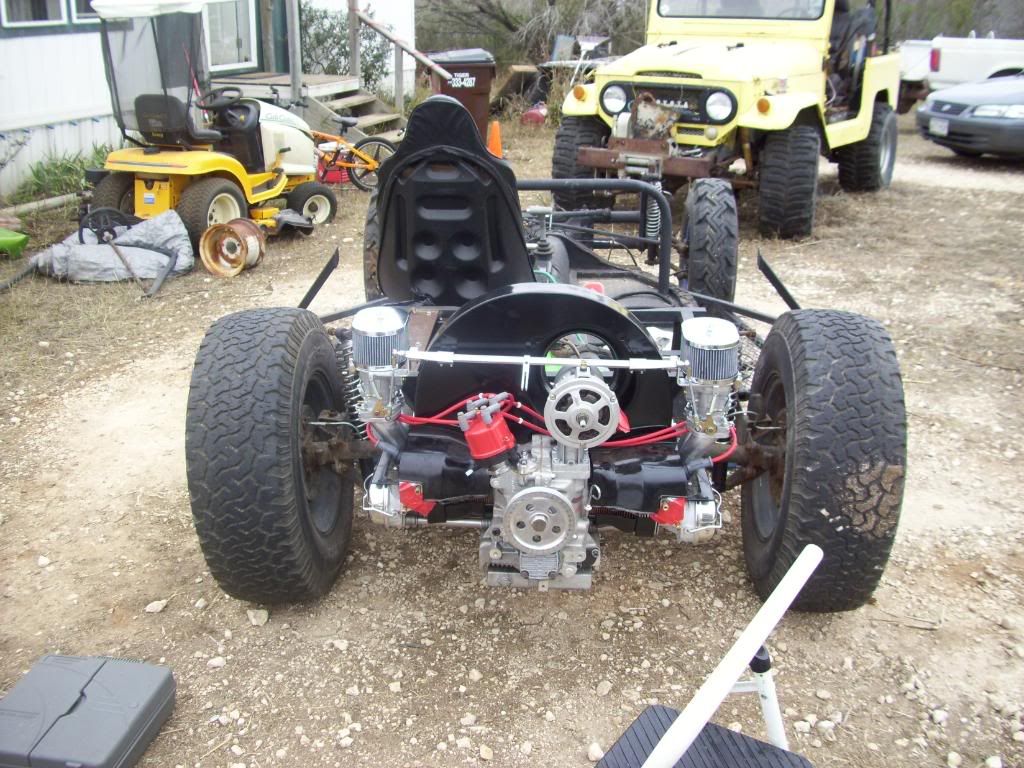
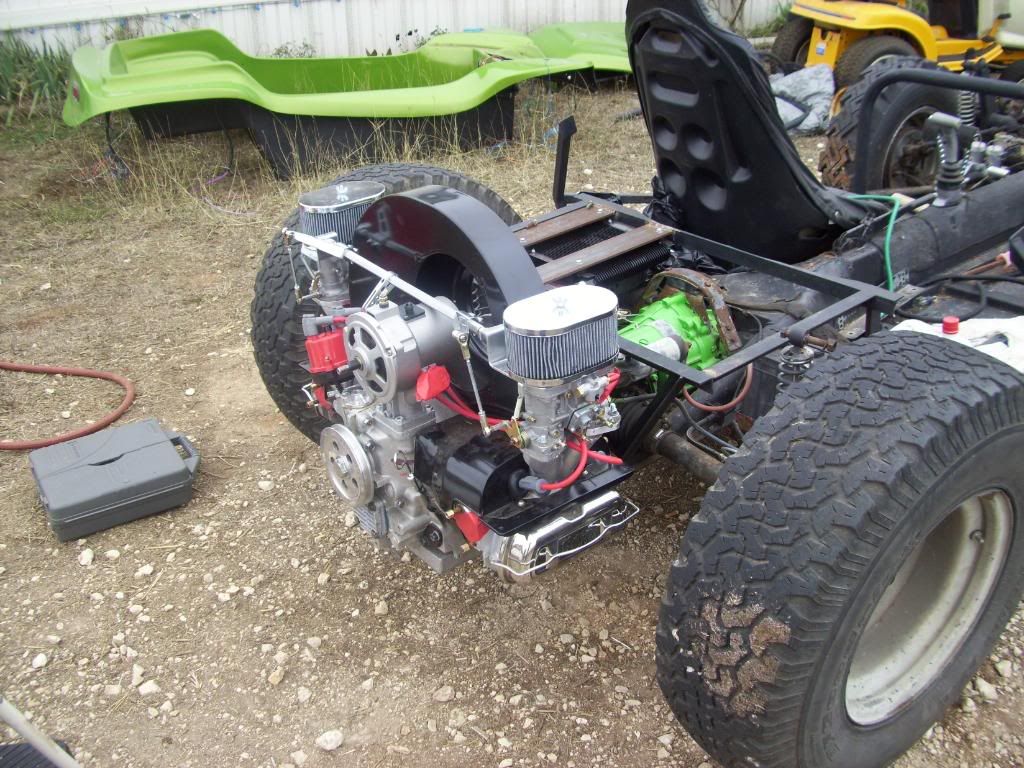
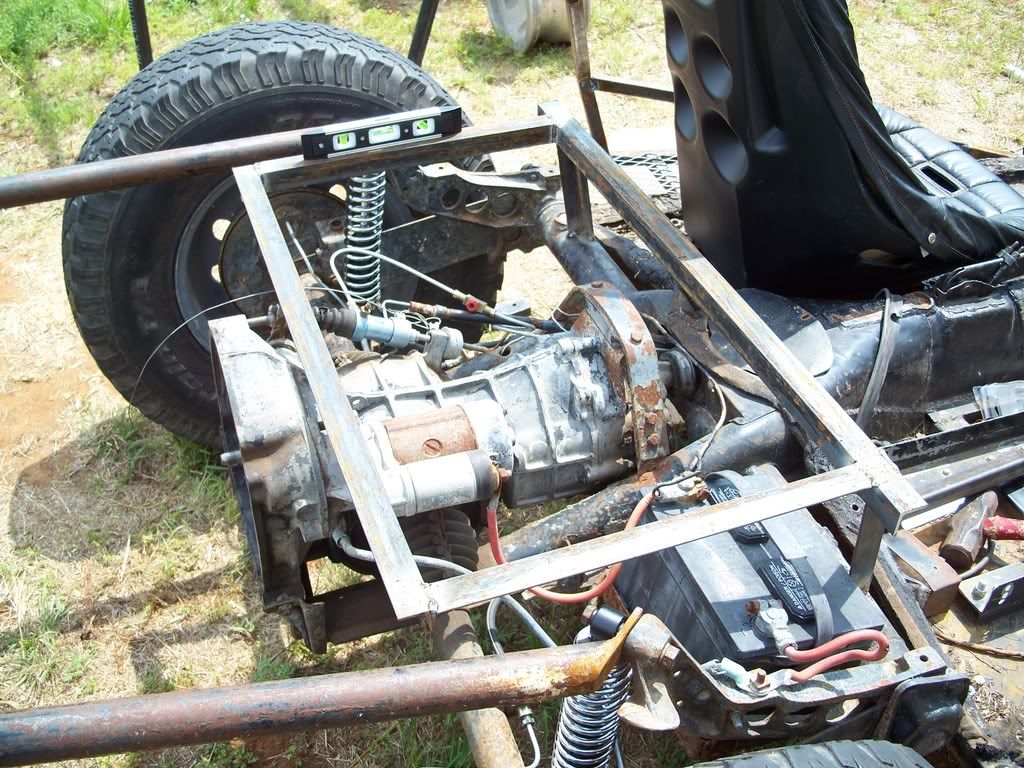
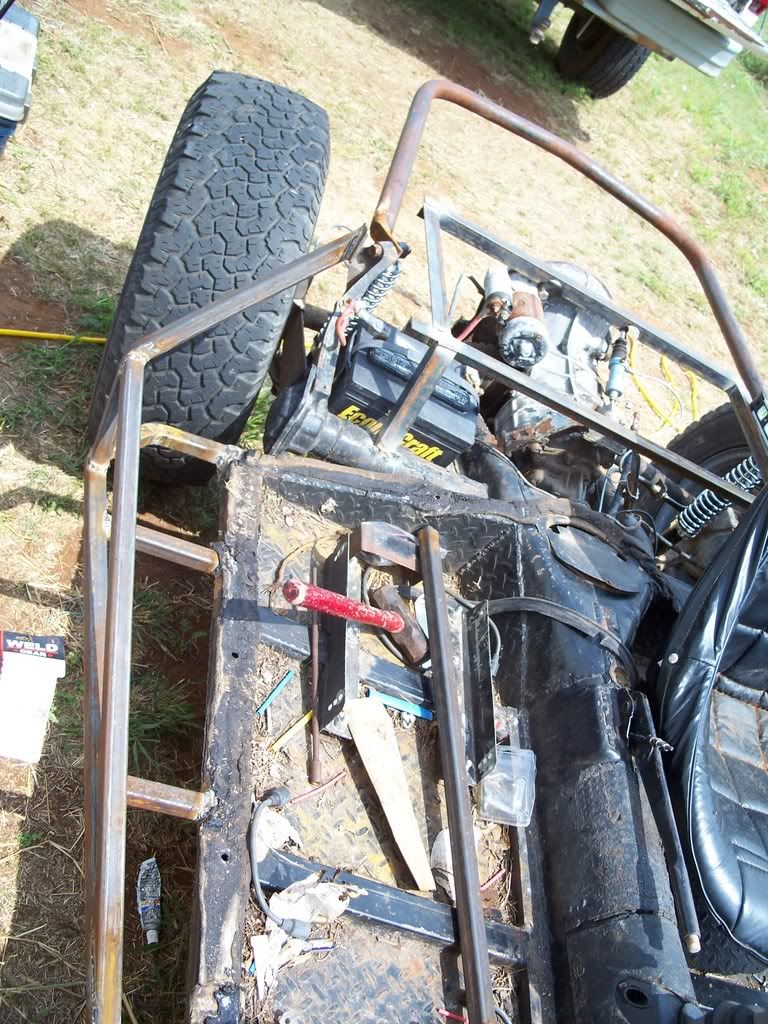
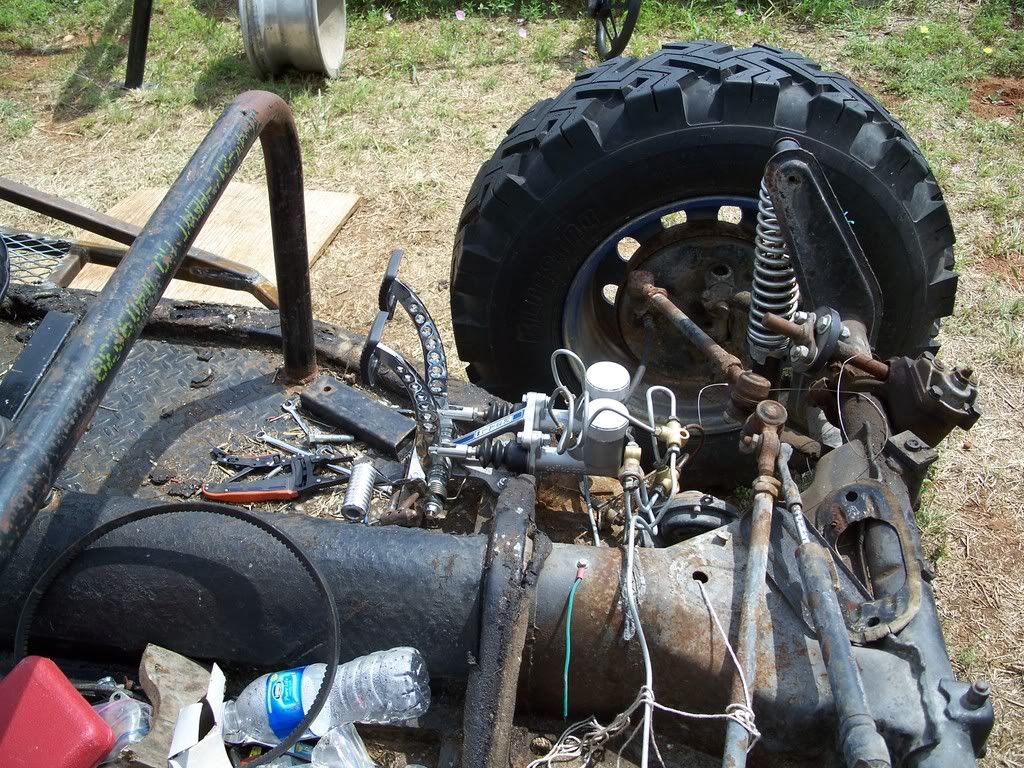
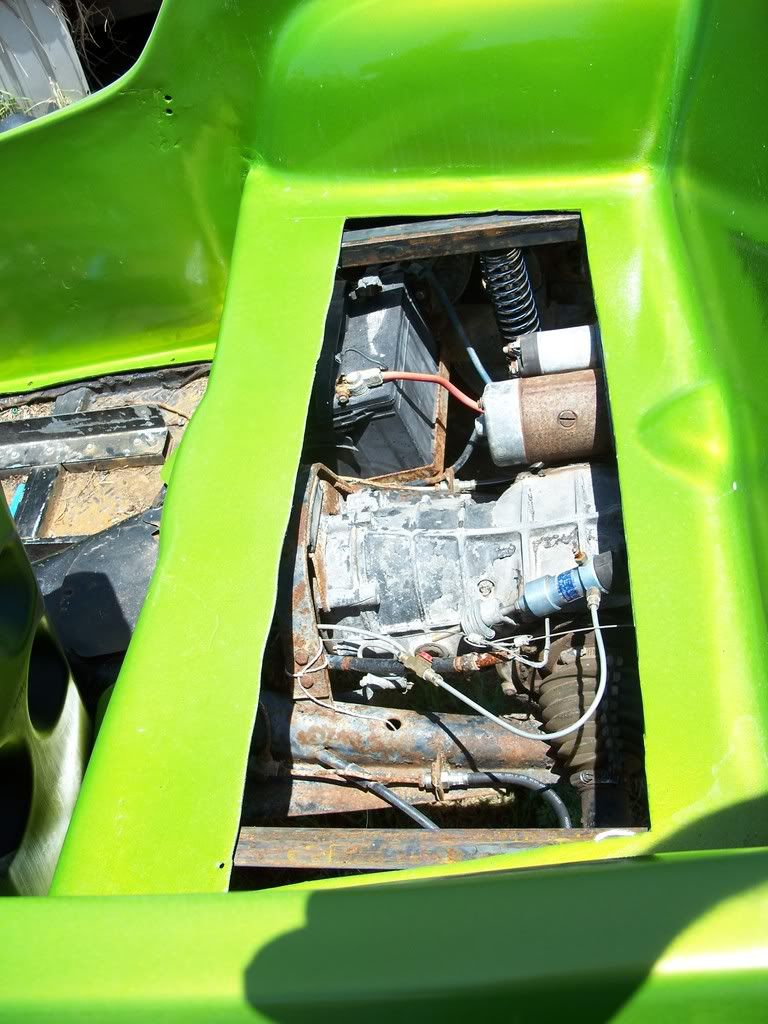
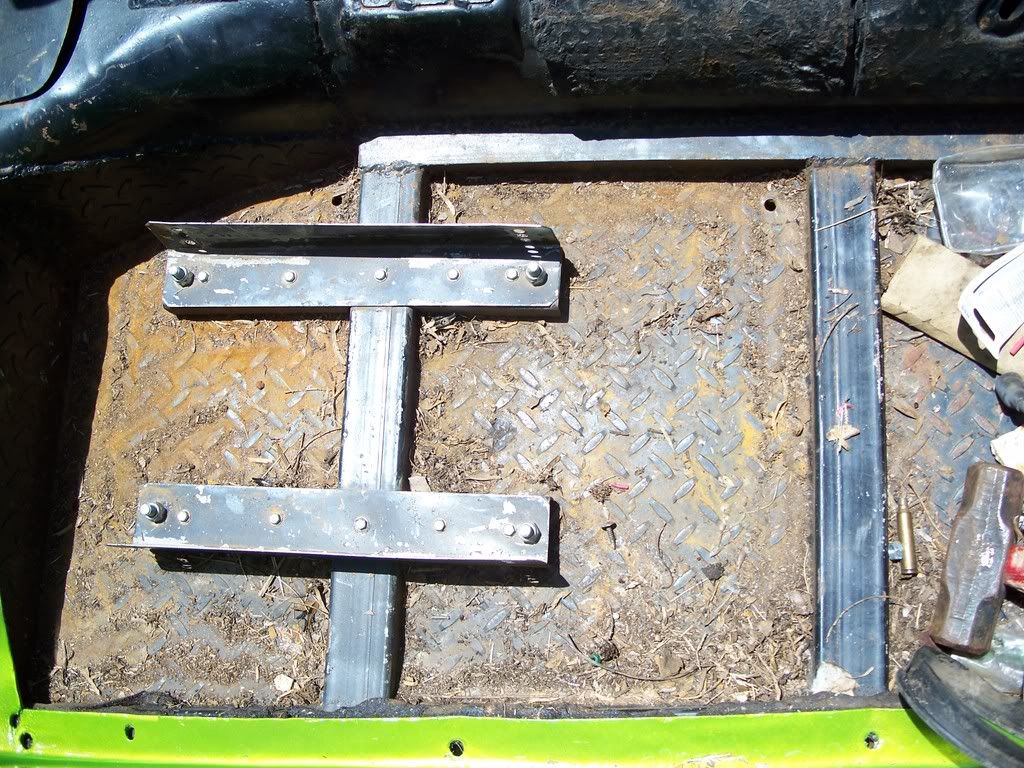
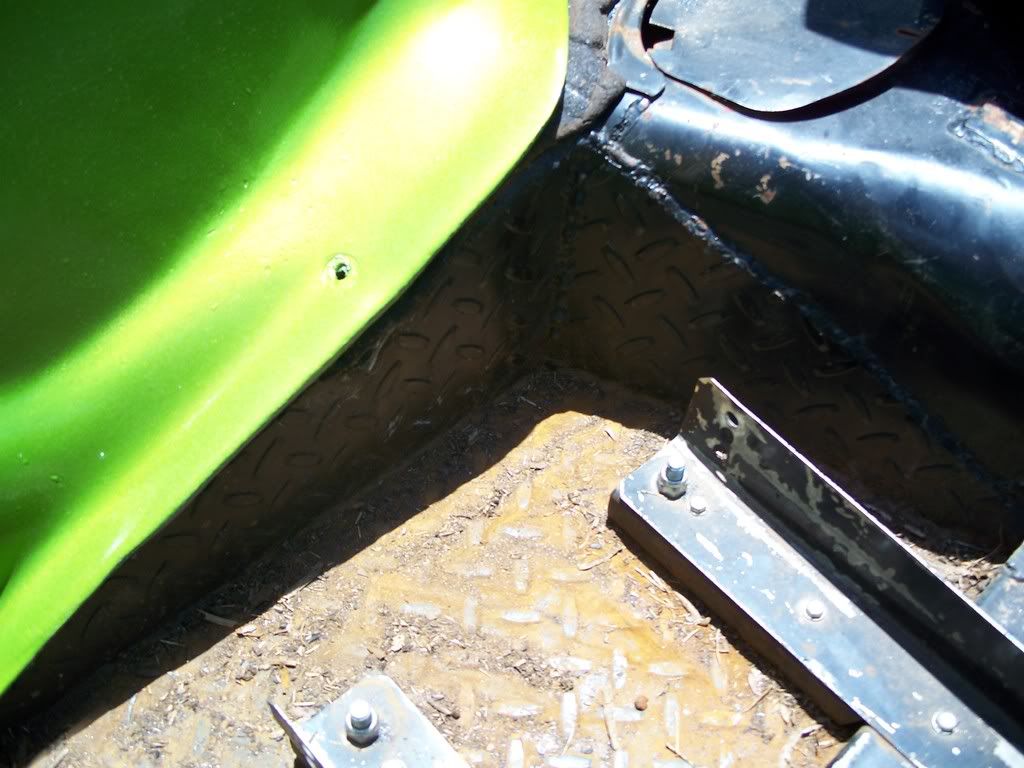
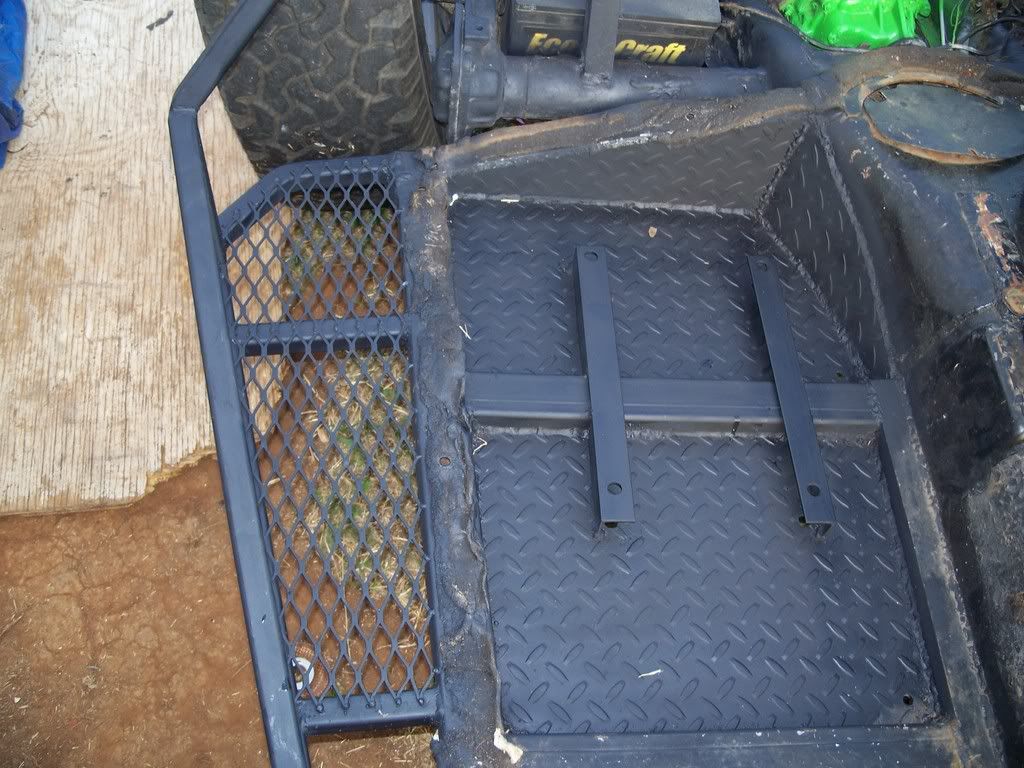
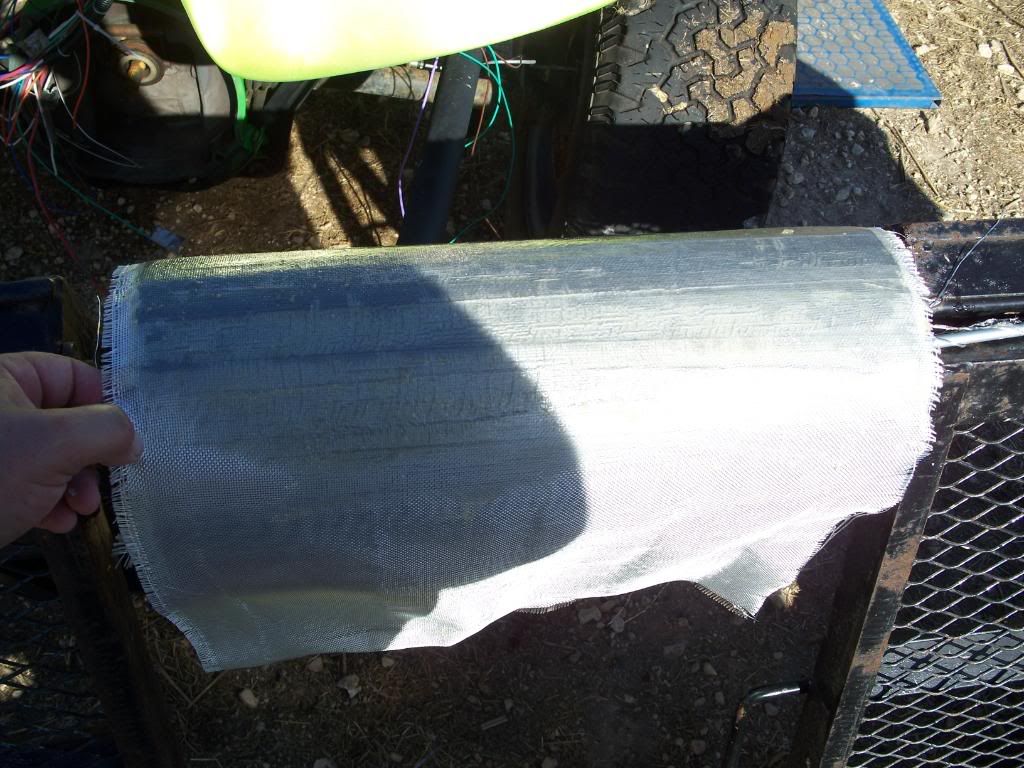
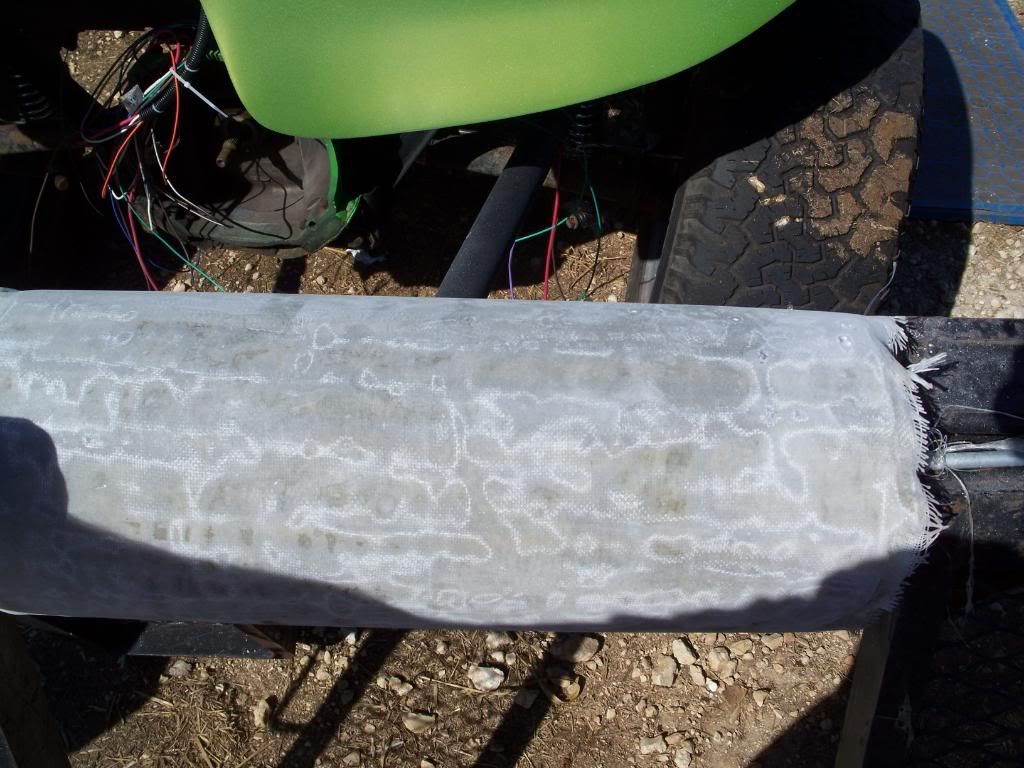
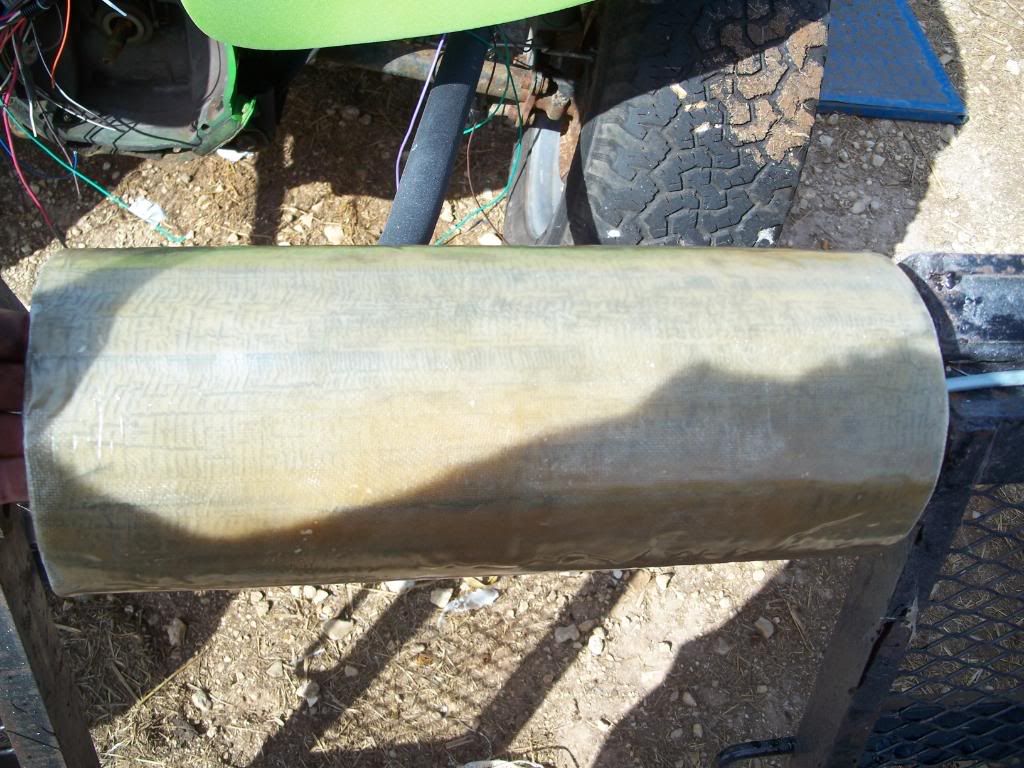
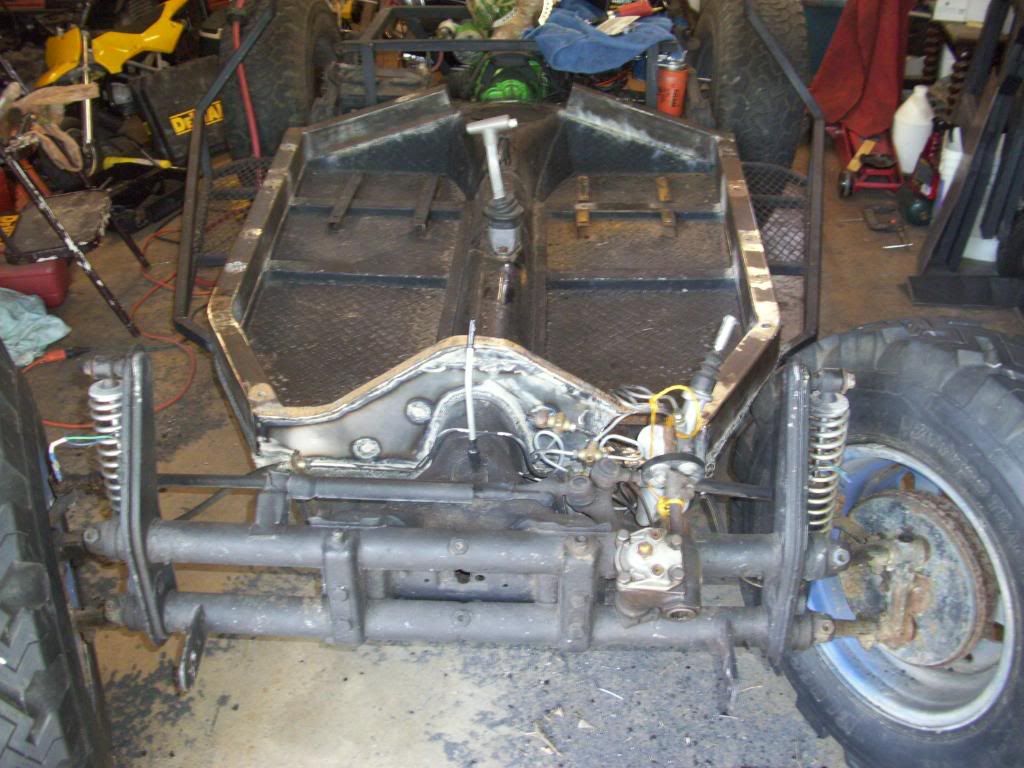
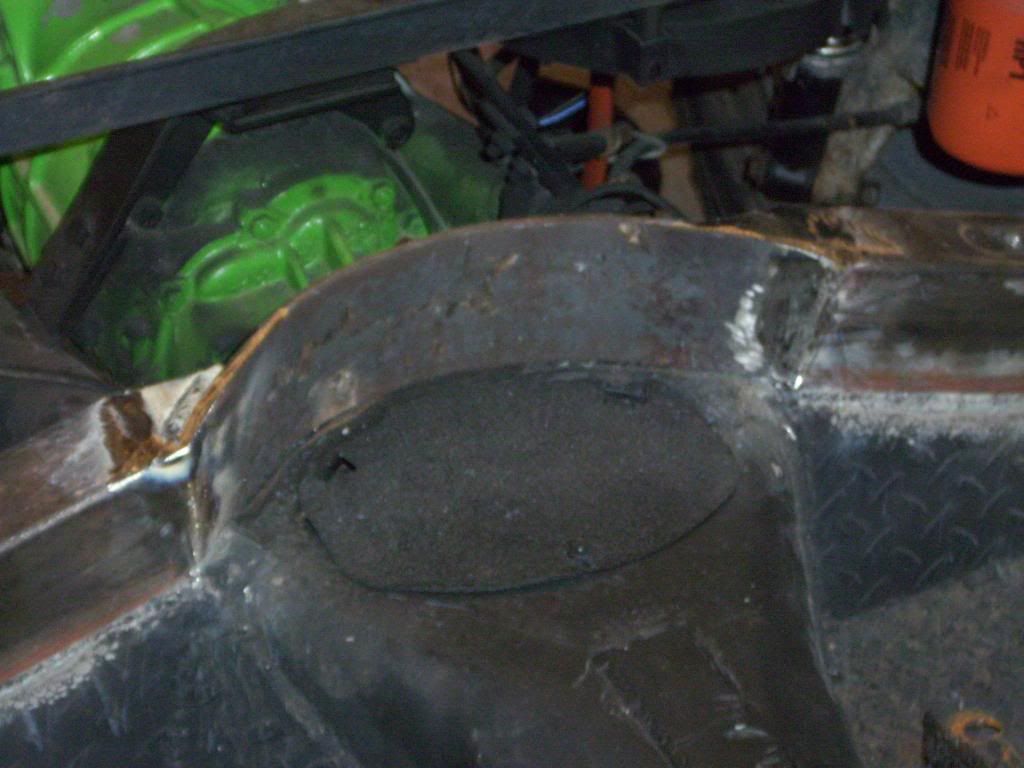
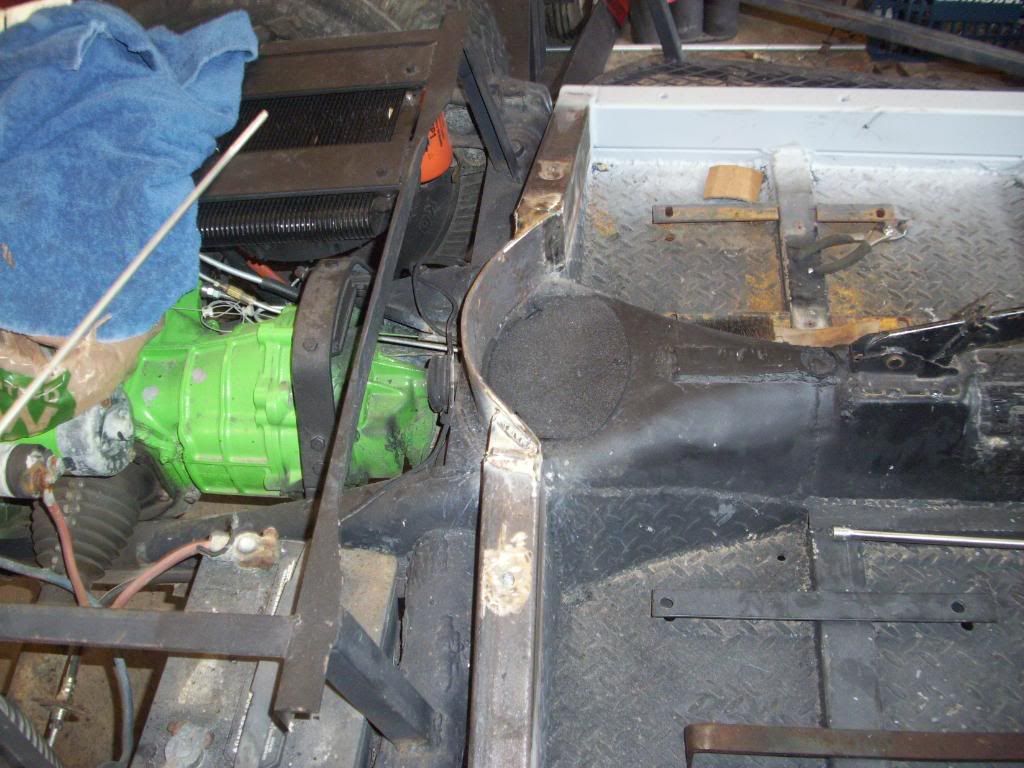
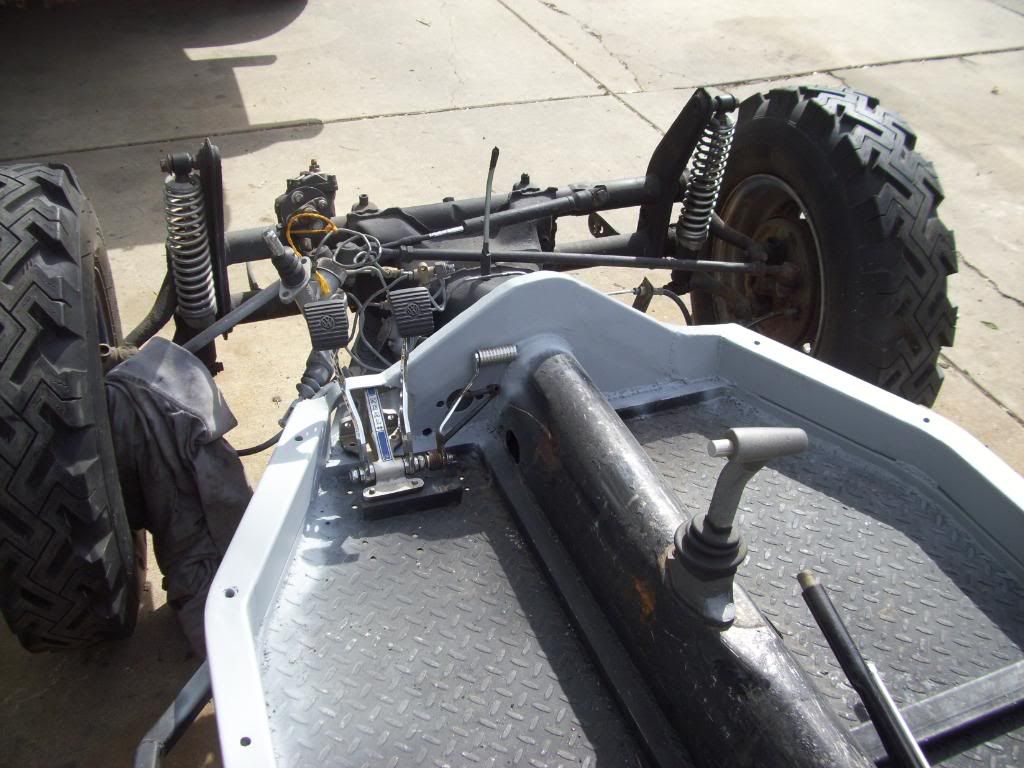
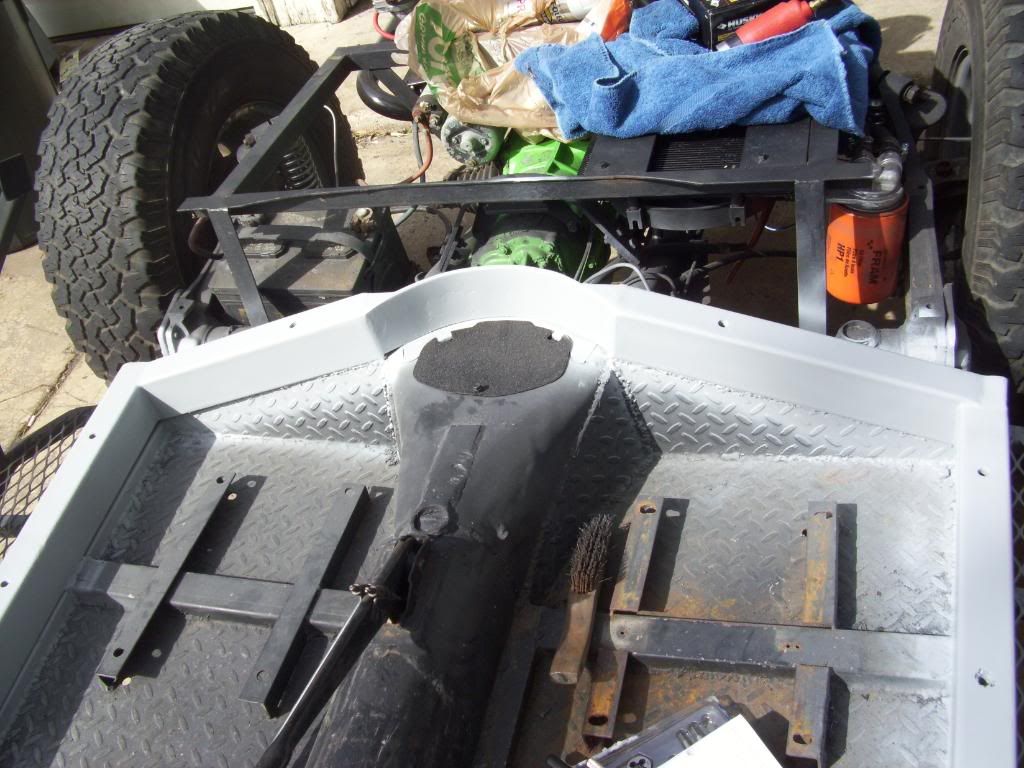
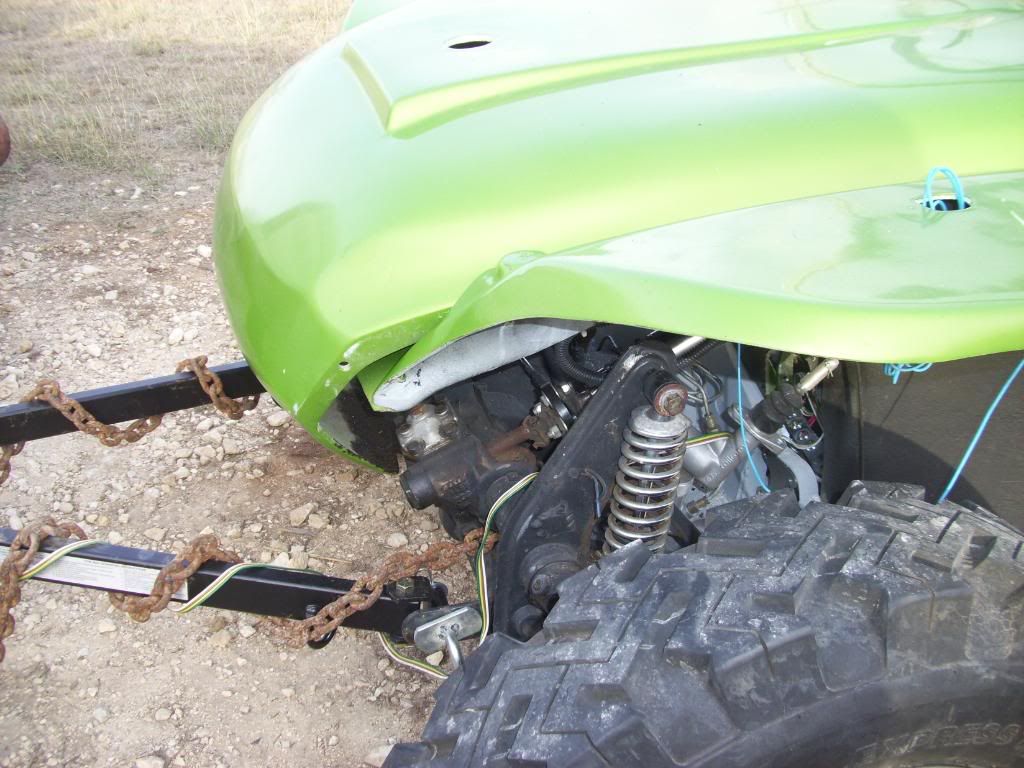
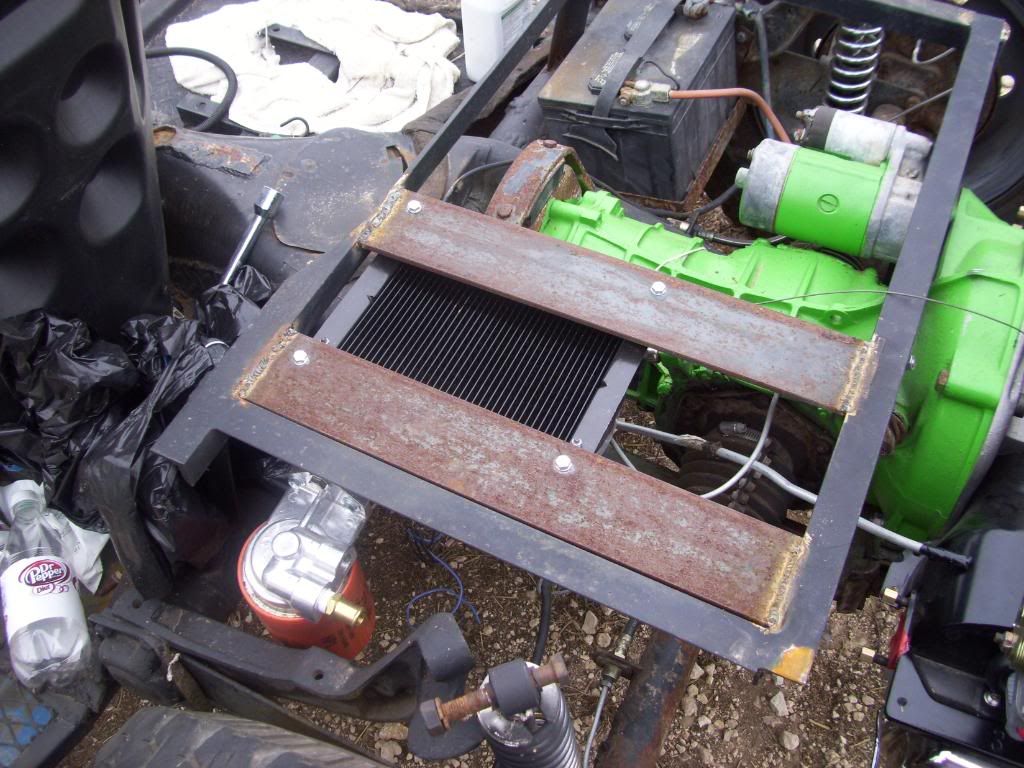
Then I needed to mount the oil filter, and oil cooler (with powered fan). I wanted somewhere inside the frame rails for protection, but that would fairly easy to get to and change filters. I also needed a location away from things (like rocks) that would poke nasty holes in them (or rip them off), so it had to be fairly high. I decided I would build mounts above the transaxle and on the drivers side-

Image

Image

Image

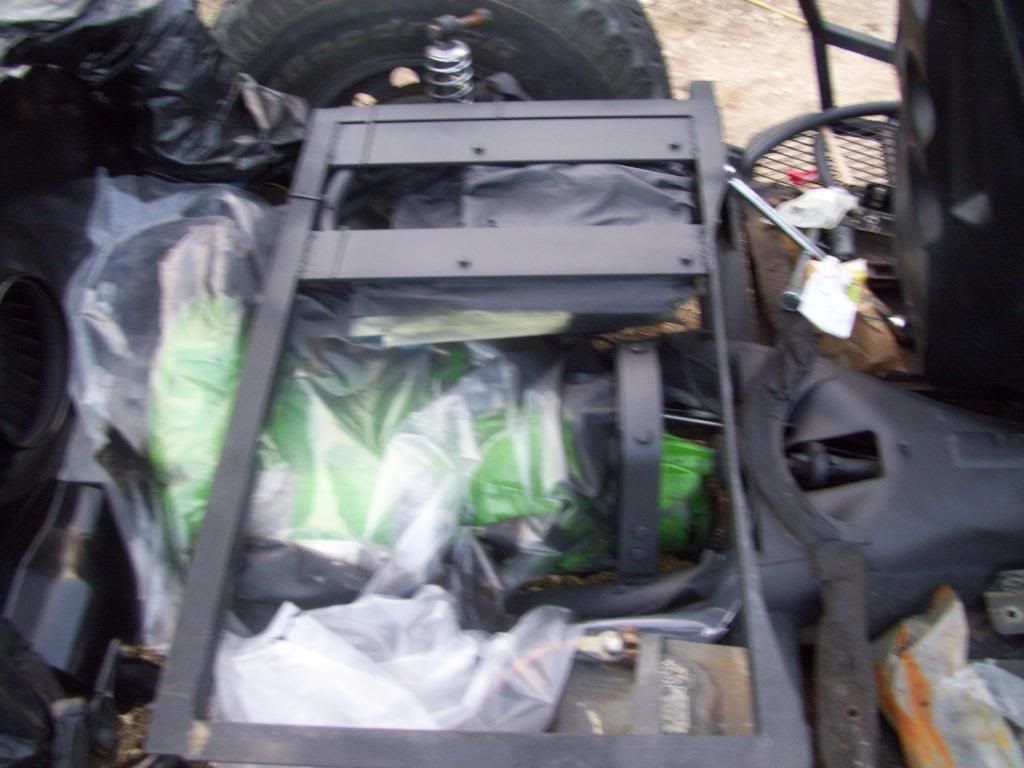
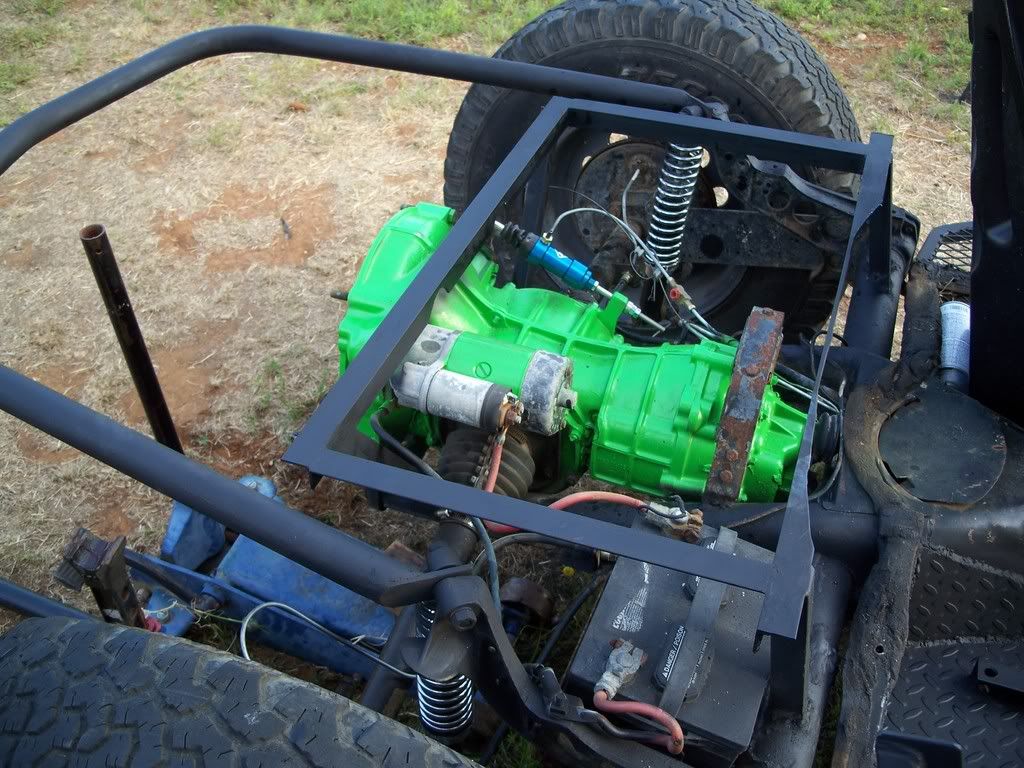
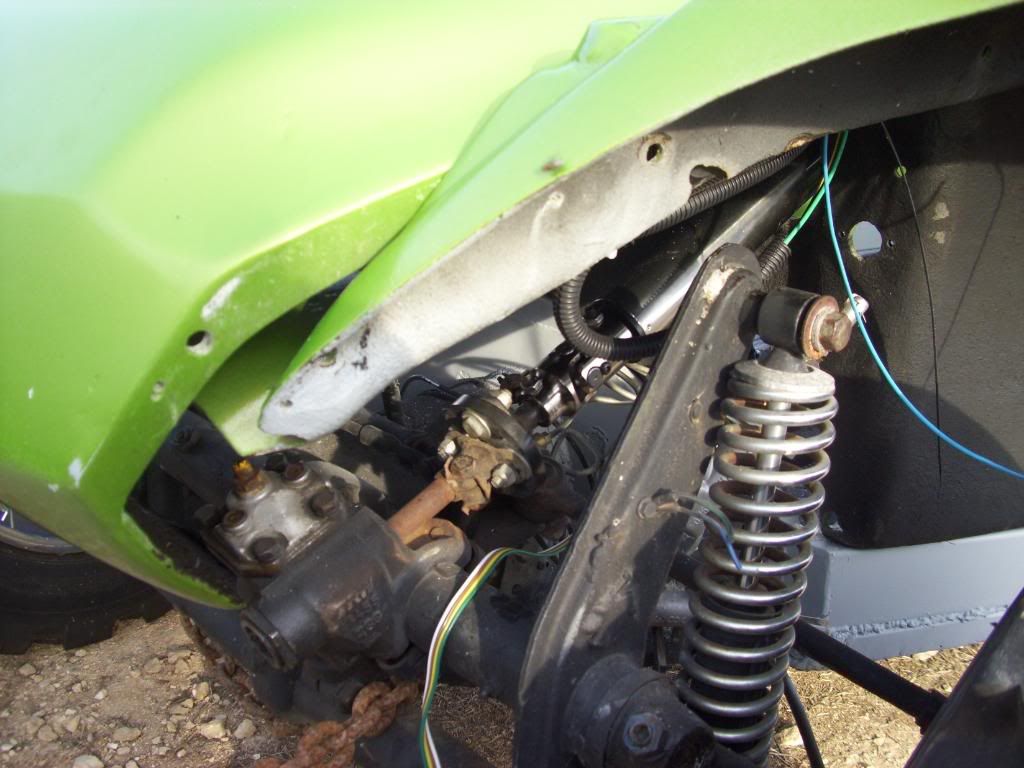
With that complete, I turned my attention to the fuel line. I've had a vehicle burn before due to rubber fuel line....so I NEVER run any anywhere near the engine as a consequence. However, with the exposed nature of a buggy, and the lack of fenders, firewalls etc, for me to mount to, I again had to exercise my creativity (for all I know, I am just re-inventing the wheel, but I FEEL creative, so there!)-

Image

Image

Image

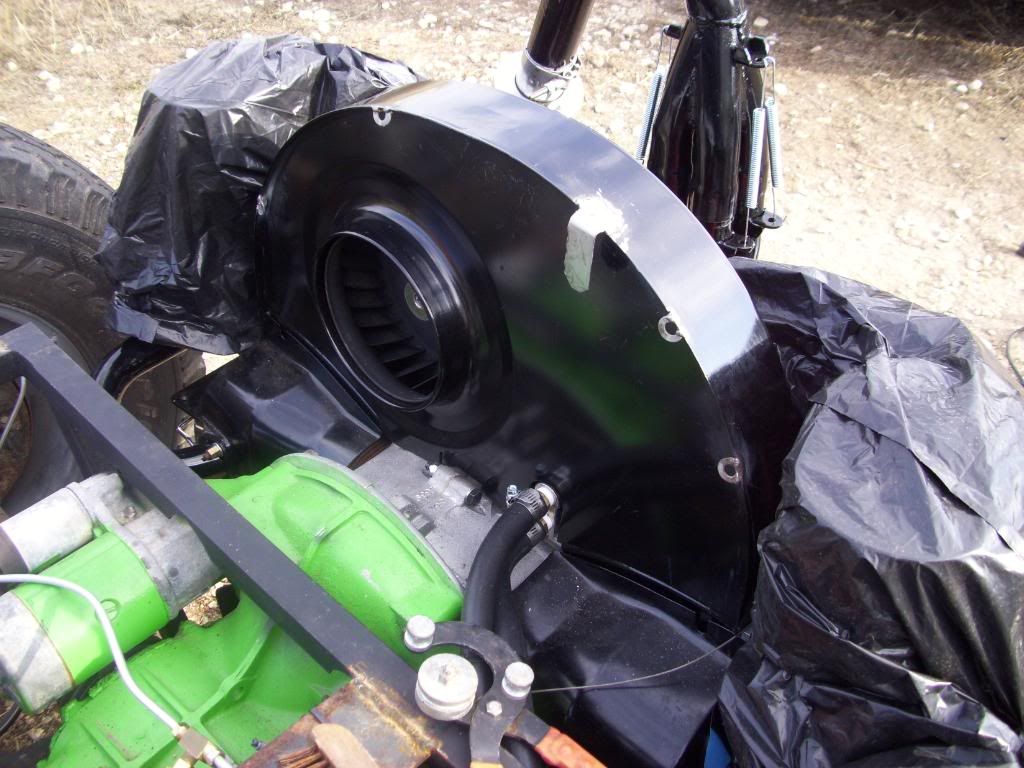
I fabricated a mount for the "T", then welded some washer along with the "T" mount to the doghouse. I then painted everything gloss black to match the doghouse, and the oil cooler and filter mounts flat black.

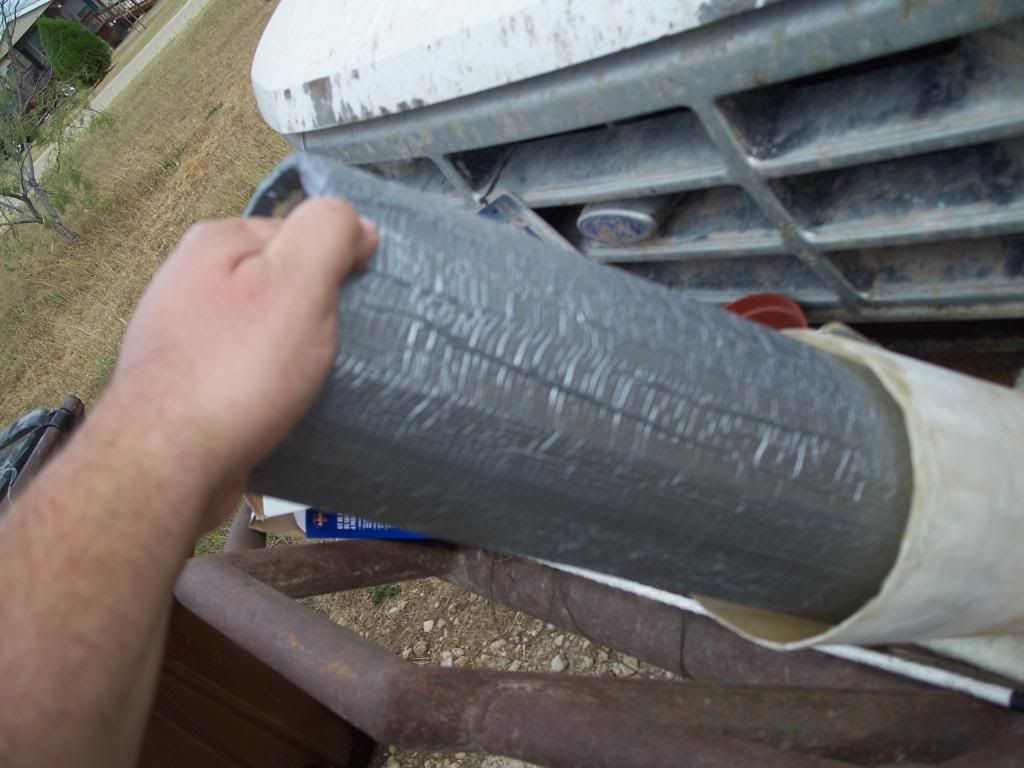
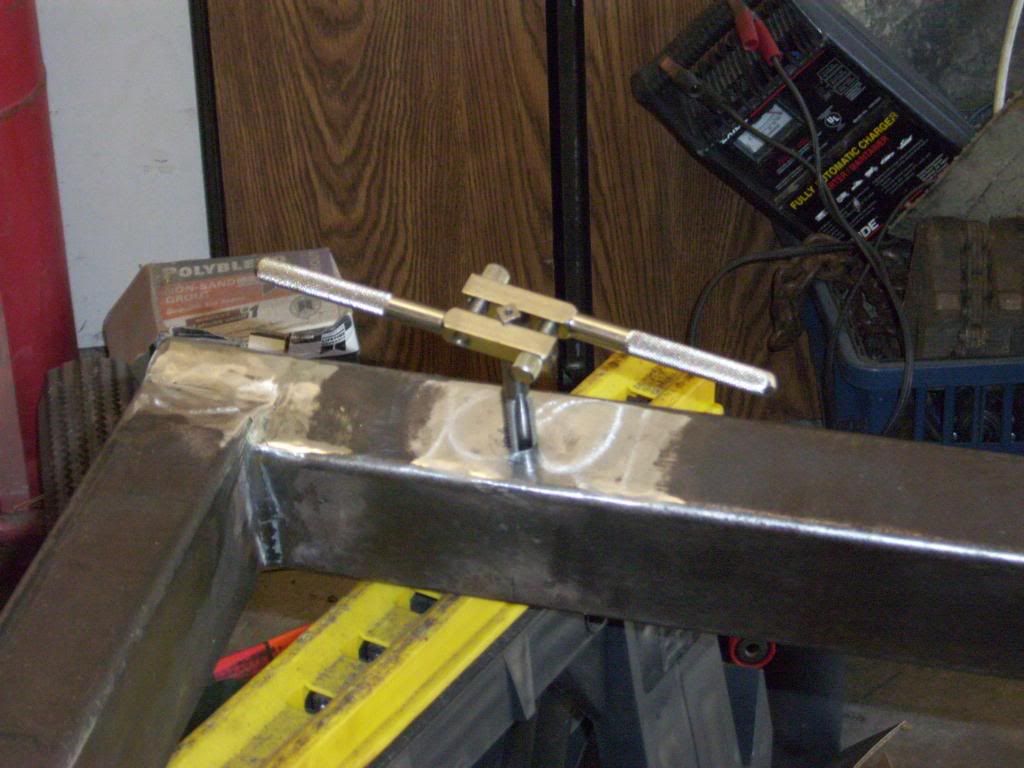
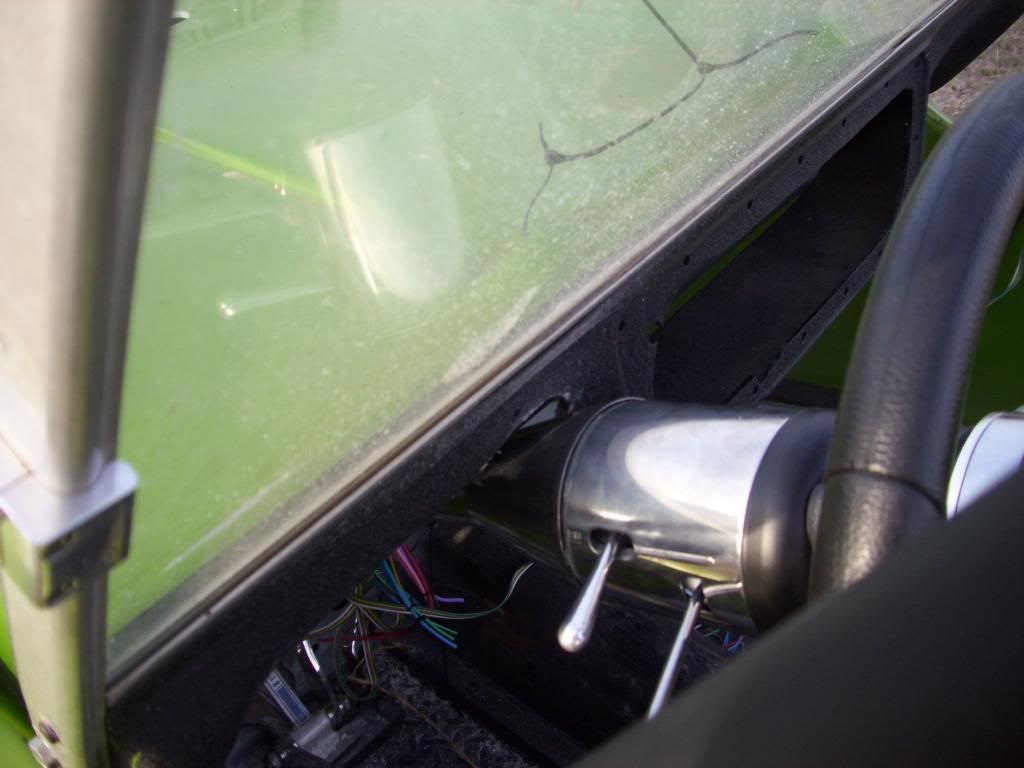
Then I had to make a mount for the CDI and coil....This nearly defeated me. I have no mill, no metal brake, no one near me that is a certified aircraft welder (just playing, Tom :P
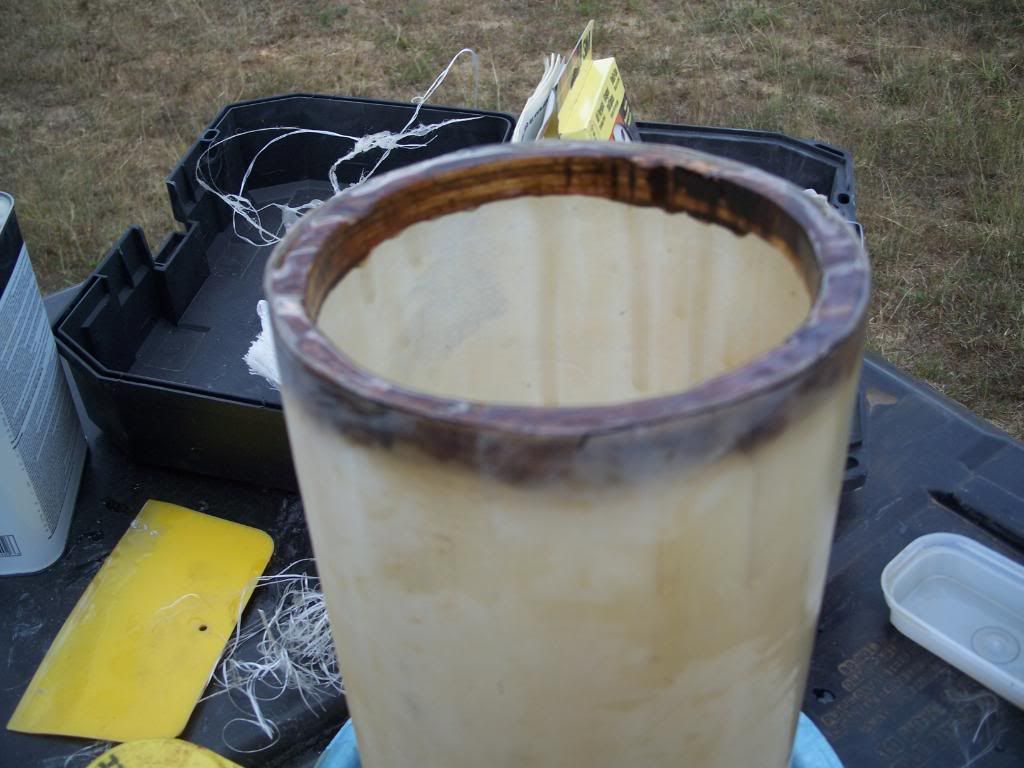
). So I sat, looked the the "engine bay", whilst (I love that word) playing with the aforementioned CDI box and coil. Inspiration struck me. I went inside and grabbed some parts from and old computer case I had save (god knows why.....) and then spent another very frustrating 8 hours fabricating.....Unfortunately, I took no pics during the process, and only have the completed product-

Image

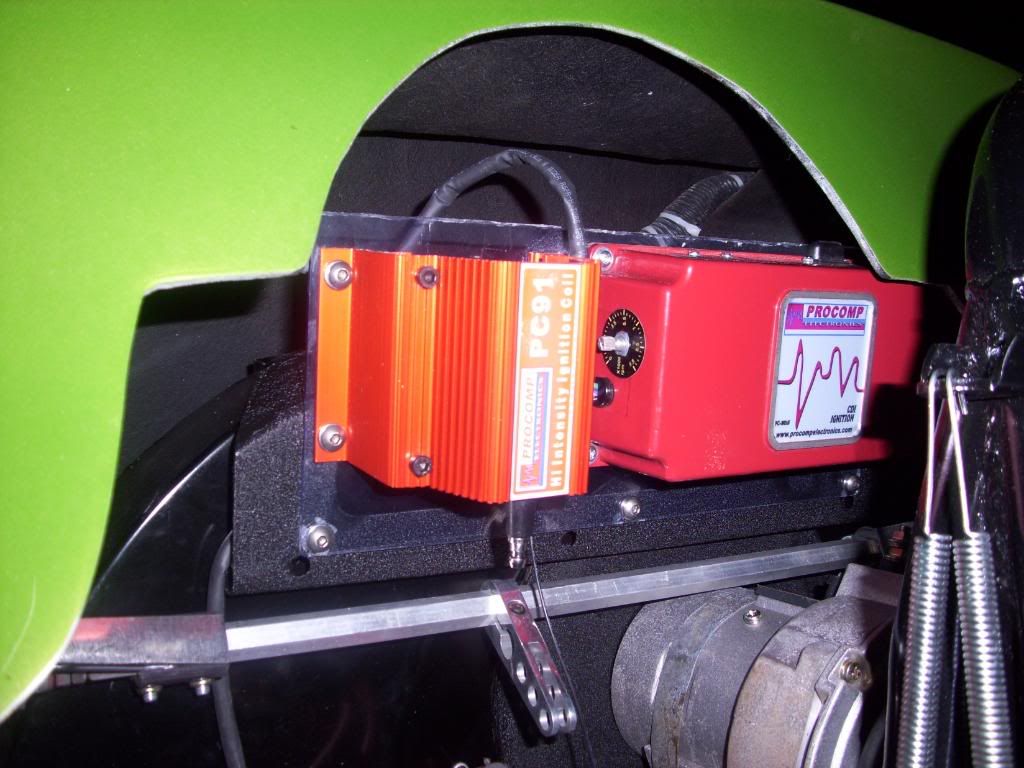
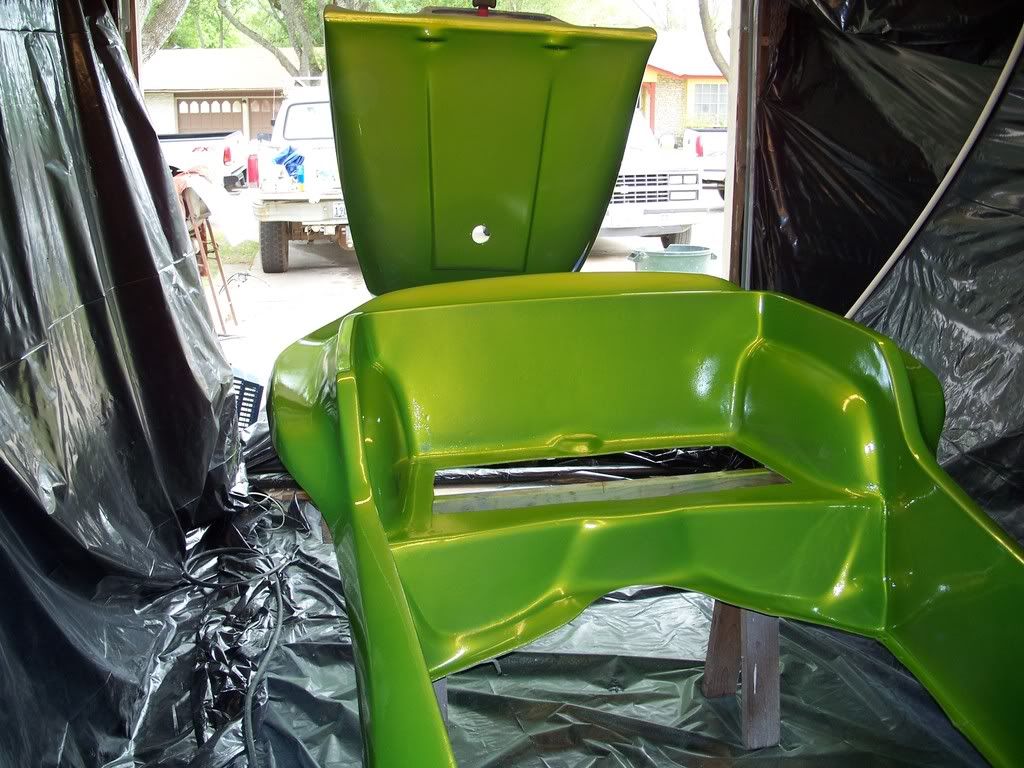
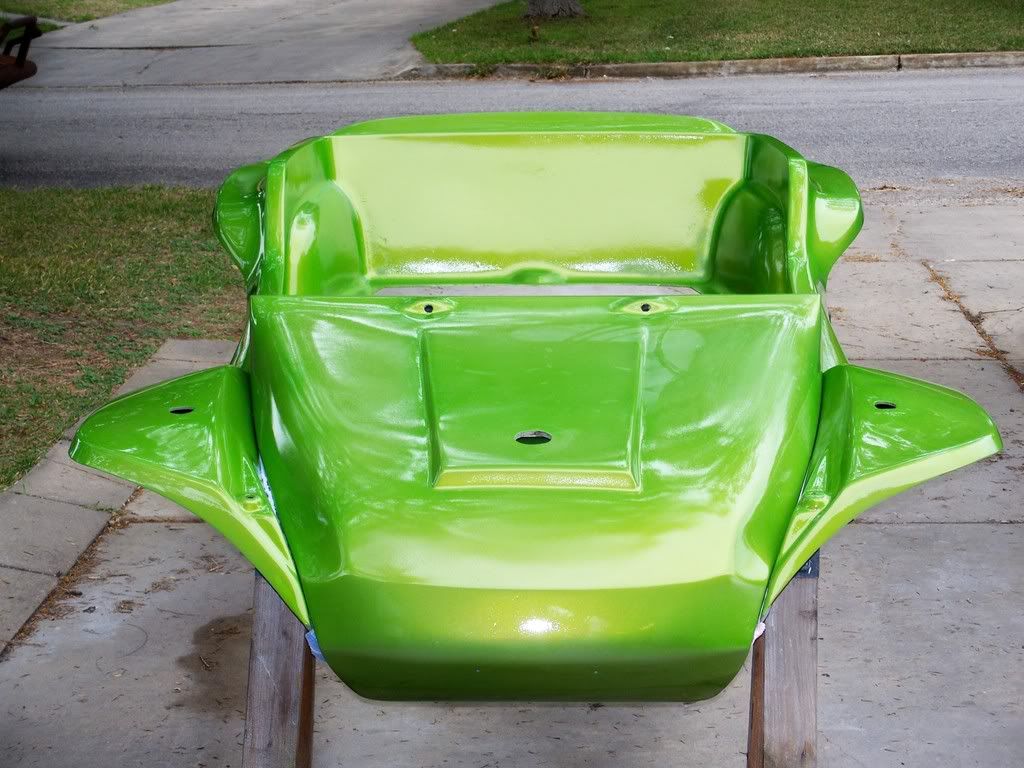
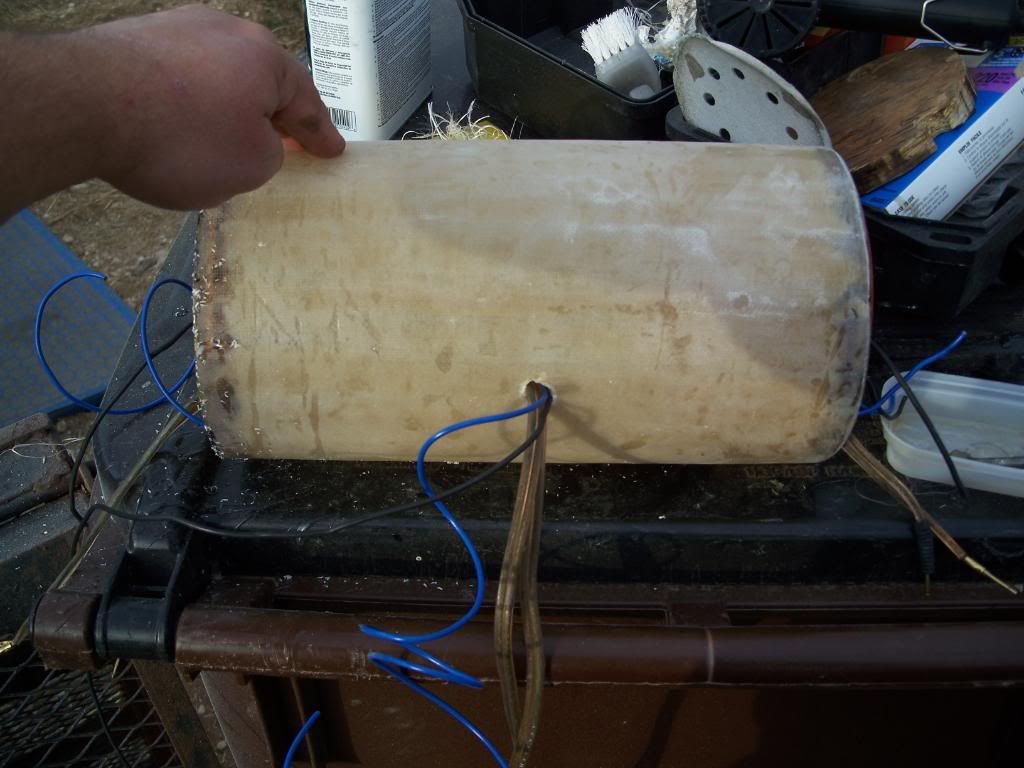
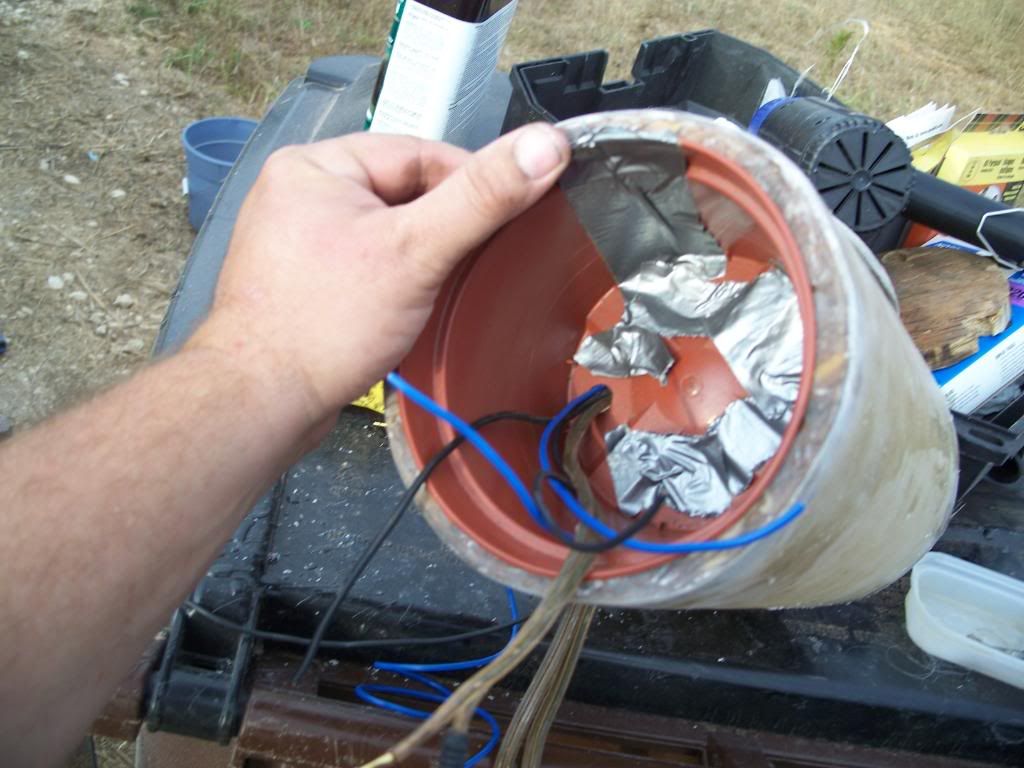
As you can see, the mount is made from aluminum, with a welded stiffener that you cannot see, between the coil and the CDI, with bolts from both items going through it. The coil and CDI are actually mounted to plexiglass (because I wanted to see how it would look). The aluminum is painted with wrinkle paint, matching the fan cover, done to set it off from the gloss black of the doghouse and tins. I wanted a very "simple" look, and will stick with varying textures of black, and billet aluminum where I can.

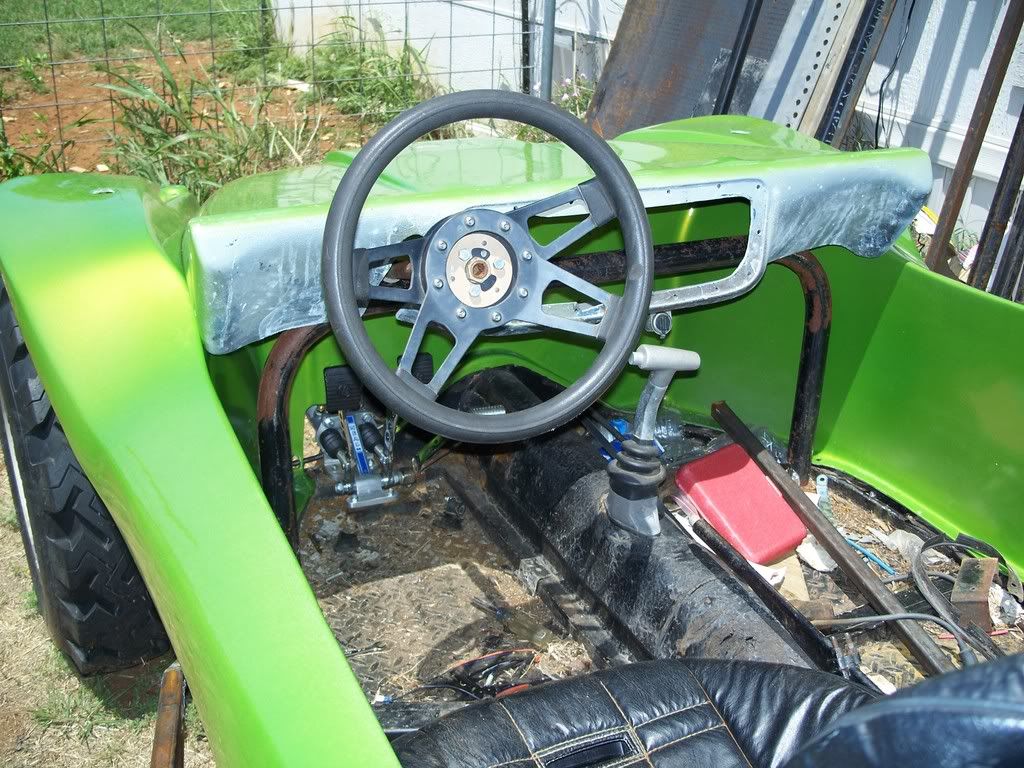
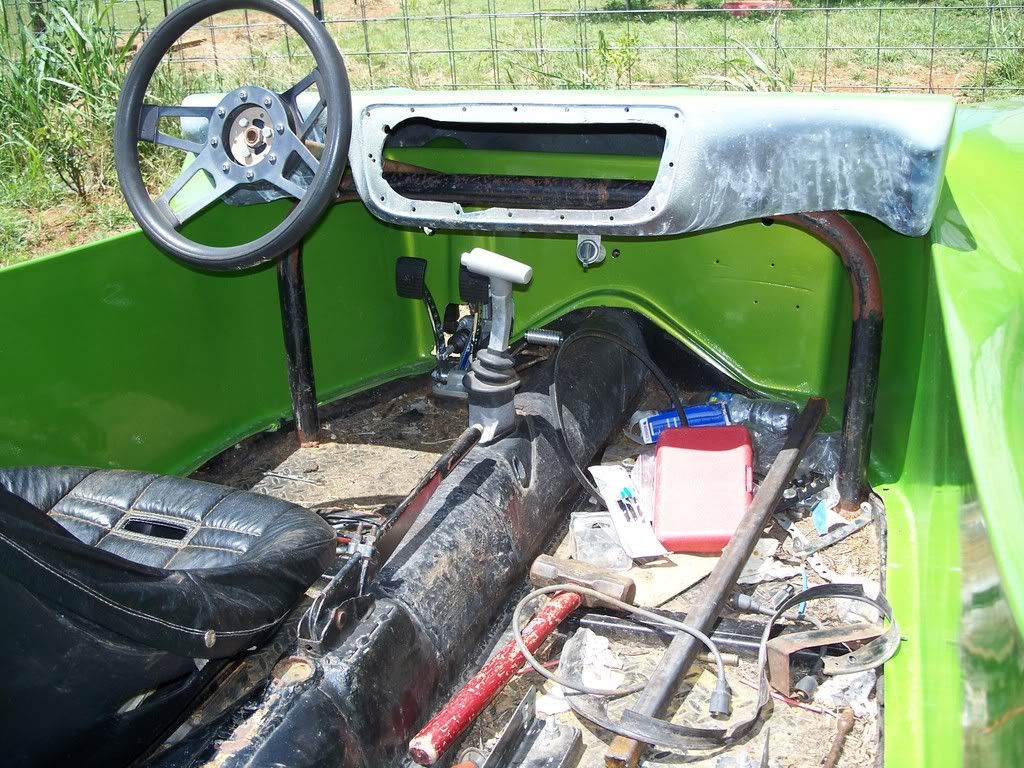
I also prepped and painted the dash in wrinkle paint. The dash insert will be engine turned stainless steel (to be done when I have finally made my gauge selection (details, details, details)

Image

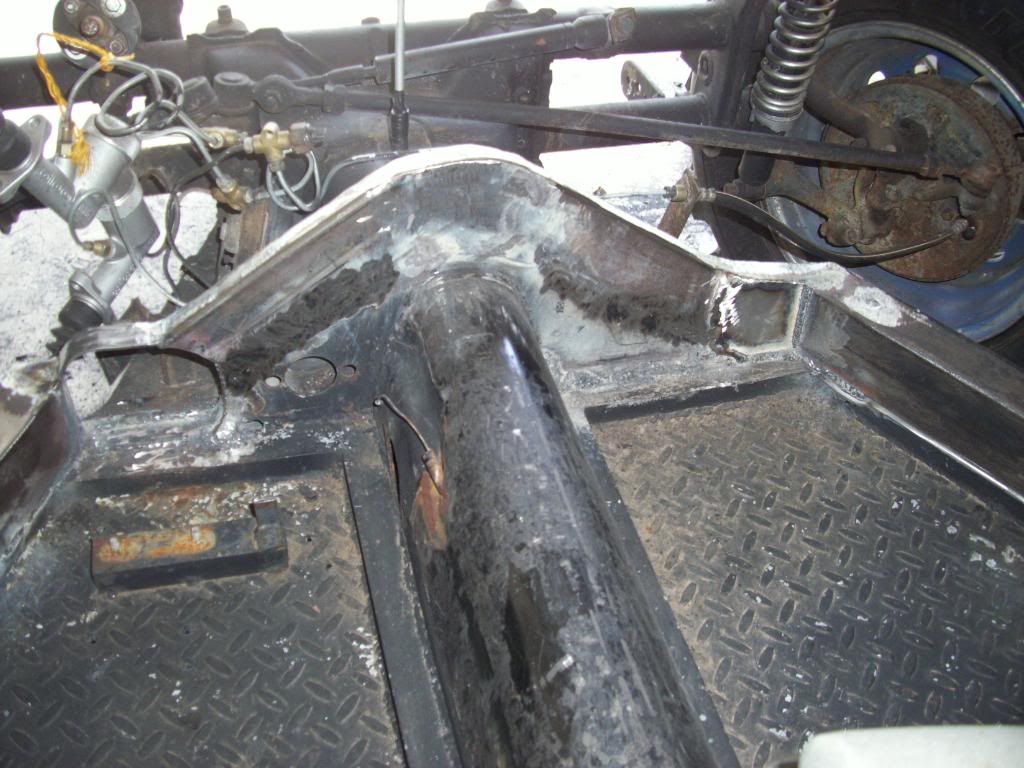
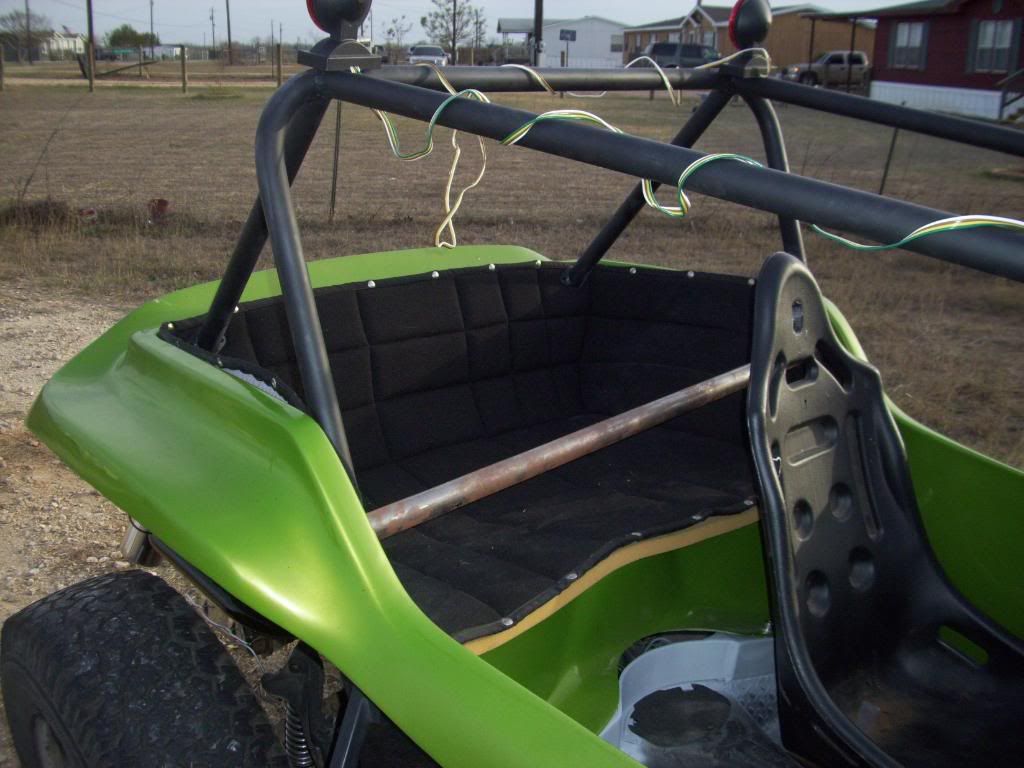
Hopefully soon, TexasBuggies will have time to see me and build my cage, I want to do that before I permanently mount the body and complete the wiring. However, I still have the 2" body lift to fab, and some frame horn rust to combat (how in the hell did I miss THAT???)

Sorry for the long post, I hope you enjoyed it in at least some way :-)
This IS my sig......
User avatar
Greaph
Buggy Nut
 
Posts: 88
Joined: 28 Mon Apr, 2008 6:52 pm
Location: San Antonio TX

work

Postby Texasbuggys » 04 Sun Jan, 2009 1:40 am

Check your PM, lets do it! Have sent ya some info on dates and some options that ya may be intrested in. Thanks
Get your new short or long body, custom chassis, show cages, bumpers and accessories at http://www.texasbuggys.com

E-Mail Texasbuggys@suddenlink.net or call 361-218-6272
User avatar
Texasbuggys
Buggyholic
 
Posts: 1039
Joined: 01 Sat Oct, 2005 9:30 pm
Location: Victoria Texas

Postby Greaph » 04 Sun Jan, 2009 2:09 am

By the way, the coil-over springs are a legacy that I would like to remove. Anyone have recommendations they would like to make? I intend to use Fox shocks when the 3x3's and a-arms are put in, but that is a year (or so) from now. I would like a smoother ride until them :-)

TIA
This IS my sig......
User avatar
Greaph
Buggy Nut
 
Posts: 88
Joined: 28 Mon Apr, 2008 6:52 pm
Location: San Antonio TX

Hello there

Postby Texasbuggys » 04 Sun Jan, 2009 7:38 pm

PM sent to ya. Hope ya can get'r in here as I have another one lined up and the red one is coming back for full blown tear down in a few weeks.
Get your new short or long body, custom chassis, show cages, bumpers and accessories at http://www.texasbuggys.com

E-Mail Texasbuggys@suddenlink.net or call 361-218-6272
User avatar
Texasbuggys
Buggyholic
 
Posts: 1039
Joined: 01 Sat Oct, 2005 9:30 pm
Location: Victoria Texas

Postby Jack Duncan » 06 Tue Jan, 2009 12:48 am

Greaph, I'm concerned about your oil lines to the cooler. Buggy Warehouse told me to use high pressure hoses with flared fittings or the 140 psi on a cold start-up would blow the hoses right off. I would rather do what you did with the barb fittings. It would be much cheaper and much easier. :?
White Bandit
User avatar
Jack Duncan
Buggyholic
 
Posts: 343
Joined: 16 Tue Sep, 2008 11:06 pm
Location: Boerne, TX

Postby Greaph » 06 Tue Jan, 2009 9:17 am

I, too, am concerned about the barb fittings. I will watch them closely, to be sure. However, the oil lines are actually hydraulic hose, and rated to 1500psi. If the barb fittings don't do the trick, I will order the hydraulic fittings for it :-).
This IS my sig......
User avatar
Greaph
Buggy Nut
 
Posts: 88
Joined: 28 Mon Apr, 2008 6:52 pm
Location: San Antonio TX

Postby Greaph » 07 Wed Jan, 2009 9:39 pm

Well, I dropped it off with Bobby at Texas Buggies today for the roll cage work. He is very nice guy, and I enjoyed the time I spent talking to him. I was a little nervous leaving it for so long with someone I had never met, however, I am much easier with it now. I feel he will take good care of it. Incidentally, he is building a 6 point cage with a nice knee bar bent BEHIND the dash and a shoulder bar for the harnesses to pass over for a price I cannot argue with!
Not the closest guy to me, but definitely worth the drive. When ready, (after the body lift) I will be bringing it back to complete the cage, front bumper, and rear cage!

Thanks Bobby!
This IS my sig......
User avatar
Greaph
Buggy Nut
 
Posts: 88
Joined: 28 Mon Apr, 2008 6:52 pm
Location: San Antonio TX

SURPRISE David she is done!

Postby Texasbuggys » 01 Sun Feb, 2009 10:30 pm

Get your new short or long body, custom chassis, show cages, bumpers and accessories at http://www.texasbuggys.com

E-Mail Texasbuggys@suddenlink.net or call 361-218-6272
User avatar
Texasbuggys
Buggyholic
 
Posts: 1039
Joined: 01 Sat Oct, 2005 9:30 pm
Location: Victoria Texas

Postby Greaph » 01 Sun Feb, 2009 11:34 pm

WOW! I love it. Thanks a lot Bobby! I'll bring it back when the lift is in, so we can put MORE steel into it! Thanks again!
This IS my sig......
User avatar
Greaph
Buggy Nut
 
Posts: 88
Joined: 28 Mon Apr, 2008 6:52 pm
Location: San Antonio TX

Postby Texasbuggys » 02 Mon Feb, 2009 7:28 am

Image
Get your new short or long body, custom chassis, show cages, bumpers and accessories at http://www.texasbuggys.com

E-Mail Texasbuggys@suddenlink.net or call 361-218-6272
User avatar
Texasbuggys
Buggyholic
 
Posts: 1039
Joined: 01 Sat Oct, 2005 9:30 pm
Location: Victoria Texas

Postby Greaph » 18 Wed Feb, 2009 9:57 pm

Alright! I've just gotten off the phone with David Crowe, and I'm going with a 091 IRS with porshe 930 cv-joint and 3x3 trailing arms with limiting straps for the street. We tentatively agreed to a 4.86 R&P, 1st, 2nd, and 3rd to be decided on once he crunches some numbers, and a 1.09 4th. Quaife installed, and 31" rear tires. Whew! Almost the last step before I can street it....one more item removed from the checklist.

The close we get, the more excited I am becoming...I hope to have the tranny swapped in before the salado meet, but if it's not possible, I'll use the swingaxle, then swap it out after.

If anyone has done so, could you point me to a link that details the procedure for swapping from swing to irs? TIA!!

David
Last edited by Greaph on 09 Mon Mar, 2009 2:46 am, edited 1 time in total.
This IS my sig......
User avatar
Greaph
Buggy Nut
 
Posts: 88
Joined: 28 Mon Apr, 2008 6:52 pm
Location: San Antonio TX

Postby Aquabuggy » 19 Thu Feb, 2009 1:50 pm

Greaph wrote: point me to a link that details the procedure for swapping from swing to irs? TIA!!

David


http://www.blindchickenracing.com/How_t ... ersion.htm

http://www.manxgallery.org/gallery/album91
My name is Chris and well I'm a buggy-aholic

04 Aqua buggy - sold
72 Orange buggy - sold
72 Green longbody - aka Shrek http://texasmanxclub.com/bboard/viewtopic.php?t=1082
68 Manx - viewtopic.php?f=11&t=2509
User avatar
Aquabuggy
Buggyholic
 
Posts: 942
Joined: 02 Sun Oct, 2005 10:18 am
Location: Victoria Tx

Postby Aquabuggy » 19 Thu Feb, 2009 2:23 pm

The shift rod is also higher on a bus trans about 2" you will need to address that as well.

There are basically two ways to do this
use one of these http://www.mooreparts.com/store/product/1076/AC311220/
and ether run your shift rod on top of the tunnel (requires removal of e-brake bracket) or use this adapter with some hacking on the pan to run most of the shift rod in the tunnel.
http://www2.cip1.com/ProductDetails.asp ... D710%2D003

Second option would be to use a 10 degree mount from http://www.mckenzies.com/ not shown on there web site so call em.
This mount will tilt the bus trans down in the front so the shift input shaft will align with the shift rod inside the tunnel, much nicer set up but will require a bit of fabrication.
My name is Chris and well I'm a buggy-aholic

04 Aqua buggy - sold
72 Orange buggy - sold
72 Green longbody - aka Shrek http://texasmanxclub.com/bboard/viewtopic.php?t=1082
68 Manx - viewtopic.php?f=11&t=2509
User avatar
Aquabuggy
Buggyholic
 
Posts: 942
Joined: 02 Sun Oct, 2005 10:18 am
Location: Victoria Tx

Postby Greaph » 19 Thu Feb, 2009 4:25 pm

Thanks for the information, I really appreciate it. Fabrication doesn't skeer me, but I generally dislike re-inventing the wheel. I have built, modified, and customized many cars and trucks....but I surely didn't know what I was getting into when I started this buggy!

BTW, you (Aquamanx) live in or near Victoria, correct? When I go on days off, (sometime in the next 8 days or so), I will be headed back to Bobby's place to check out his operation, converse, and maybe knock a few beers back. If your schedule doesn't conflict, I would enjoy meeting you, and perhaps putting eyeballs on your project :P
This IS my sig......
User avatar
Greaph
Buggy Nut
 
Posts: 88
Joined: 28 Mon Apr, 2008 6:52 pm
Location: San Antonio TX

Postby Aquabuggy » 19 Thu Feb, 2009 6:09 pm

You bet, Im always up for hanging out with buggy friends. Im only about 2 miles from Bobby so let me know when your heading down this way.
My name is Chris and well I'm a buggy-aholic

04 Aqua buggy - sold
72 Orange buggy - sold
72 Green longbody - aka Shrek http://texasmanxclub.com/bboard/viewtopic.php?t=1082
68 Manx - viewtopic.php?f=11&t=2509
User avatar
Aquabuggy
Buggyholic
 
Posts: 942
Joined: 02 Sun Oct, 2005 10:18 am
Location: Victoria Tx

Postby Greaph » 08 Sun Mar, 2009 4:15 pm

OK, I've been able to get some work done on the buggy finally. I want to install dual a-arms and rack and pinion steering to go with the 3x3 trailing arms. Entire suspension will be coil-overs, no torsions. In order to fit the a-arms, and retain the stock gas tank, I need to lift the body 3". So. I decided to do that next. I started with 2"x3" .095 wall square tubing, and formed the curves on the sides:

Image

Image

Then I used a hole saw and cut out the holes for the threaded sleeves:

Image

Image

And welded them in place:

Image

Image

Ground the inserts flush and ran a tap through to clean the threads:

Image

Image

And test fit the body:

Image

Image

While test-fitting the body, I made a cardboard form for the front and rear arches, then removed the body and fabricated the arches:

Image

Image

Image

Image

I welded a 16ga steel plate to the entire front wall (outside the tub) with 1.5" holes drilled in the center to increase overall strength of the front arch.
Once all welding was finished, I polished all steel with an 80 grit sanding disk, and primed using Rustoleum primer:

Image

Image

Image

Image
This IS my sig......
User avatar
Greaph
Buggy Nut
 
Posts: 88
Joined: 28 Mon Apr, 2008 6:52 pm
Location: San Antonio TX

Postby Greaph » 08 Sun Mar, 2009 4:24 pm

I am now working on installing the flaming river column and new steering wheel. Then I will start on the side impact protection (an external, modified Z-bar arrangement). Then it's back to TB's for the front and rear cages. I also am tearing the engine apart again (only run enough to burn the cam in) and replacing the crank, flywheel, and pressure plate. New assembly is from DPR, and is an 82mm stroker grind, with full circle six balancing, knife edged, wedgemated, with type 4 center journals. The flywheel is full weight ( I just prefer it), the new pressure plate is another Kennedy, the same type I have already. I just wanted everything balanced together :-).

Aspiration has changed again, I am 90% certain I will go with Redline fuel injection. The goal is still 530-560 hp at 21lbs/boost with water/alky injection. The new internals and fuel injection are just to ensure longevity.
This IS my sig......
User avatar
Greaph
Buggy Nut
 
Posts: 88
Joined: 28 Mon Apr, 2008 6:52 pm
Location: San Antonio TX

Postby Greaph » 08 Sun Mar, 2009 6:36 pm

Installed the column and wheel, need to clearance the dash a little more for the column bell, and around the steering gearbox. The gearbox no longer fits inside the hood, due to the 3" lift. I am loathe to cut the hood to fit, so I am trying to think of ways around the problem. It's getting fairly late, and my wife is getting that gleam in her eyes, the one that says I had better put my tools away pretty soon, and spend some time with the family! So here are some more pics of what was done today, and the gearbox interference:

Image

Image

Image

Image

Image

Image
This IS my sig......
User avatar
Greaph
Buggy Nut
 
Posts: 88
Joined: 28 Mon Apr, 2008 6:52 pm
Location: San Antonio TX

Postby Texasbuggys » 08 Sun Mar, 2009 9:00 pm

The body lift turned out great David! Makes a big difference in the off-road look to the buggy. Here is a side before with the cage. Column tuned out sweet!

Image
Get your new short or long body, custom chassis, show cages, bumpers and accessories at http://www.texasbuggys.com

E-Mail Texasbuggys@suddenlink.net or call 361-218-6272
User avatar
Texasbuggys
Buggyholic
 
Posts: 1039
Joined: 01 Sat Oct, 2005 9:30 pm
Location: Victoria Texas

Postby Texasbuggys » 08 Sun Mar, 2009 9:02 pm

Hood and box, Ok David, if you are going a-arm up front it will not be an issue, swap over to rack and pinion. If you decide to keep the beam, cut out carefully and we will build a skid plate into the front. I am going to do one on the wifes buggy and we will may do one on matters mid-travel buggy.
Get your new short or long body, custom chassis, show cages, bumpers and accessories at http://www.texasbuggys.com

E-Mail Texasbuggys@suddenlink.net or call 361-218-6272
User avatar
Texasbuggys
Buggyholic
 
Posts: 1039
Joined: 01 Sat Oct, 2005 9:30 pm
Location: Victoria Texas


Return to Member's Projects

Who is online

Users browsing this forum: No registered users and 4 guests

cron