Vee Dub Nut's buggy build
Moderator: Ken
118 posts
• Page 3 of 3 • 1, 2, 3
![]() by Faron » 05 Tue Aug, 2008 12:42 am
by Faron » 05 Tue Aug, 2008 12:42 am
WoW This is going to be a nice lookig Buggy. I never thought I would like the colors you have used, but they look great!
Get out there and enjoy your Dune Buggy! www.savethetexasdunebuggy.com faron@savethetexasdunebuggy.com
- Faron
- Buggyholic
- Posts: 867
- Joined: 04 Tue Oct, 2005 10:20 pm
- Location: Canyon Lake, Texas
![]() by Don » 05 Tue Aug, 2008 7:40 am
by Don » 05 Tue Aug, 2008 7:40 am
Adam,
Why did you have to take it in and out three times? Just curious because I am in the process of installing a donor transmission myself and I'd like to avoid any problems. Below is a pic of my trans after cleaning and painting.
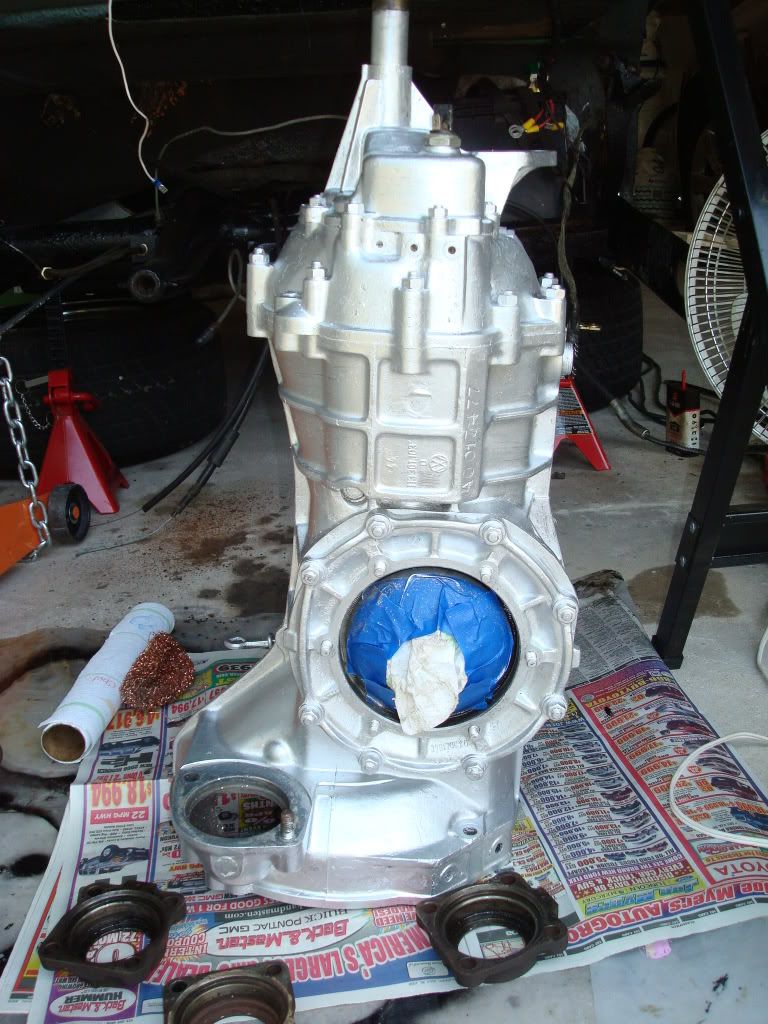
Why did you have to take it in and out three times? Just curious because I am in the process of installing a donor transmission myself and I'd like to avoid any problems. Below is a pic of my trans after cleaning and painting.
1967 Dune Buggy - aka Shrek
-

Don - Buggy Nut
- Posts: 180
- Joined: 06 Mon Aug, 2007 7:55 pm
- Location: Pearland
![]() by Vee Dub Nut » 05 Tue Aug, 2008 11:52 am
by Vee Dub Nut » 05 Tue Aug, 2008 11:52 am
Faron wrote:WoW This is going to be a nice lookig Buggy. I never thought I would like the colors you have used, but they look great!
Yea.. I think it will all pull together well in the end. Most people are thrown off by the individual colors on each different piece. The picture I have in my head looks good, we'll see if I can pull it off for real though
Fightin' Texas Aggie Class of 2006
1967 Beetle
19?? Buggy (Someday hopefully... unless I sell it too LOL)
2000 GTi
1967 Beetle
19?? Buggy (Someday hopefully... unless I sell it too LOL)
2000 GTi
- Vee Dub Nut
- Buggyholic
- Posts: 281
- Joined: 17 Mon Mar, 2008 6:21 pm
- Location: San Antonio, Tx
![]() by Vee Dub Nut » 05 Tue Aug, 2008 11:58 am
by Vee Dub Nut » 05 Tue Aug, 2008 11:58 am
Don wrote:Adam,
Why did you have to take it in and out three times? Just curious because I am in the process of installing a donor transmission myself and I'd like to avoid any problems. Below is a pic of my trans after cleaning and painting.
Hey Don.. your trans is looking good. I had to pull mine in and out for a couple of different reasons:
Install #1 - I'm using a Type 3 trans and I forgot to swap out the hockey stick in the nose cone like I was told that I had to do
Install #2 - broke the front transmission mount during reinstall and had to pull it all back out to fix it
Install #3 - Realized that the hockey stick that I swapped in was the wrong one, cause my old trans had bus nosecone. Back out to re-swap the hockey stick. Came to find out the original hockey stick was ok
Install #4 - Its current condition
Fightin' Texas Aggie Class of 2006
1967 Beetle
19?? Buggy (Someday hopefully... unless I sell it too LOL)
2000 GTi
1967 Beetle
19?? Buggy (Someday hopefully... unless I sell it too LOL)
2000 GTi
- Vee Dub Nut
- Buggyholic
- Posts: 281
- Joined: 17 Mon Mar, 2008 6:21 pm
- Location: San Antonio, Tx
![]() by blackthree4me » 07 Thu Aug, 2008 5:29 pm
by blackthree4me » 07 Thu Aug, 2008 5:29 pm
nice to see someone still building swing axil buggys
you go boy
you go boy
if it aint broke, break it then fix it
-

blackthree4me - Buggyholic
- Posts: 631
- Joined: 12 Wed Oct, 2005 1:13 pm
- Location: Spring TX
![]() by Vee Dub Nut » 07 Thu Aug, 2008 9:39 pm
by Vee Dub Nut » 07 Thu Aug, 2008 9:39 pm
I'm kind of partial to swing axles.. all of my cars have been pre-irs era
I may get railed for saying this.. but the post 68 Beetle kind of lost its charm with me
I may get railed for saying this.. but the post 68 Beetle kind of lost its charm with me
Fightin' Texas Aggie Class of 2006
1967 Beetle
19?? Buggy (Someday hopefully... unless I sell it too LOL)
2000 GTi
1967 Beetle
19?? Buggy (Someday hopefully... unless I sell it too LOL)
2000 GTi
- Vee Dub Nut
- Buggyholic
- Posts: 281
- Joined: 17 Mon Mar, 2008 6:21 pm
- Location: San Antonio, Tx
![]() by Vee Dub Nut » 08 Fri Aug, 2008 1:20 pm
by Vee Dub Nut » 08 Fri Aug, 2008 1:20 pm
LOL...
Fightin' Texas Aggie Class of 2006
1967 Beetle
19?? Buggy (Someday hopefully... unless I sell it too LOL)
2000 GTi
1967 Beetle
19?? Buggy (Someday hopefully... unless I sell it too LOL)
2000 GTi
- Vee Dub Nut
- Buggyholic
- Posts: 281
- Joined: 17 Mon Mar, 2008 6:21 pm
- Location: San Antonio, Tx
![]() by buggieBob » 13 Wed Aug, 2008 8:06 pm
by buggieBob » 13 Wed Aug, 2008 8:06 pm
I have beem working alote lately and finly got time to look over your work on the frame I like the way it is turning out. I have shourten three frames this is a fine job. I see you install the support for the back seat I did it to all the ones I have done. It is going to be nice when you get fineshed
My name is Bobby and I'm a buggy-aholic
-

buggieBob - Buggy Nut
- Posts: 56
- Joined: 05 Fri Oct, 2007 5:21 pm
- Location: Victoria Texas
![]() by Vee Dub Nut » 13 Wed Aug, 2008 9:43 pm
by Vee Dub Nut » 13 Wed Aug, 2008 9:43 pm
Thanks for the kind words Bob.. The chassis work is very time consuming, but I like the way its turning out.
My wife and I are already thinking about the next one. We are thinking a long body
My wife and I are already thinking about the next one. We are thinking a long body
Fightin' Texas Aggie Class of 2006
1967 Beetle
19?? Buggy (Someday hopefully... unless I sell it too LOL)
2000 GTi
1967 Beetle
19?? Buggy (Someday hopefully... unless I sell it too LOL)
2000 GTi
- Vee Dub Nut
- Buggyholic
- Posts: 281
- Joined: 17 Mon Mar, 2008 6:21 pm
- Location: San Antonio, Tx
![]() by Vee Dub Nut » 06 Sat Sep, 2008 8:34 pm
by Vee Dub Nut » 06 Sat Sep, 2008 8:34 pm
We'll nothing to major to report...
As I told a lot of yall at the Roundup, I've been traveling a lot with work starting a synthetic fuels demonstration at Ft. Bliss the past few months. Mix that with some vacation for the wife and I, and a fair amount of steady company through our area.. the buggy has taken the back seat.
Did some garage cleaning today. I finally bought a bench grinder so I can wire wheel all the old hardware thats going back on the chassis. This brought up the need for a proper work bench since I only had a cardboard box to use as a bench before I ended up getting a large sturdy shelf from Lowes that's doubling as my work bench. I have storage on top and bottom, and I set the middle shelf to my height to set up for a work bench. Here are a few shots..

More of a closeup of the multipurpose work bench

Did get the adjustable beam painted and the new urethane inserts installed. This was the beam that was in my sedan before one of the roller bearings on the trailing arms self destructed. I kept this one when I swapped in my narrowed beam and refurbished it for the buggy. I will be using dropped spindles too.. so the two of them combined should leave me with a decent ride quality

I painted the adjusters brown to accent with the wheels. There will be a few small bits here and there that will be brown to go along with the color scheme... but they will be very subtle things like this

Anyways.. made good progress today. Life doesn't get much better

Next up is finish cleaning and painting the spring plates and remount the rear wheels. My spindles should be in next week, and I had new balljoints pressed in the trailing arms a while back; so I should be able to get the front back together. That will allow me to roll the chassis around again, which will be nice.
As I told a lot of yall at the Roundup, I've been traveling a lot with work starting a synthetic fuels demonstration at Ft. Bliss the past few months. Mix that with some vacation for the wife and I, and a fair amount of steady company through our area.. the buggy has taken the back seat.
Did some garage cleaning today. I finally bought a bench grinder so I can wire wheel all the old hardware thats going back on the chassis. This brought up the need for a proper work bench since I only had a cardboard box to use as a bench before
More of a closeup of the multipurpose work bench
Did get the adjustable beam painted and the new urethane inserts installed. This was the beam that was in my sedan before one of the roller bearings on the trailing arms self destructed. I kept this one when I swapped in my narrowed beam and refurbished it for the buggy. I will be using dropped spindles too.. so the two of them combined should leave me with a decent ride quality
I painted the adjusters brown to accent with the wheels. There will be a few small bits here and there that will be brown to go along with the color scheme... but they will be very subtle things like this
Anyways.. made good progress today. Life doesn't get much better
Next up is finish cleaning and painting the spring plates and remount the rear wheels. My spindles should be in next week, and I had new balljoints pressed in the trailing arms a while back; so I should be able to get the front back together. That will allow me to roll the chassis around again, which will be nice.
Fightin' Texas Aggie Class of 2006
1967 Beetle
19?? Buggy (Someday hopefully... unless I sell it too LOL)
2000 GTi
1967 Beetle
19?? Buggy (Someday hopefully... unless I sell it too LOL)
2000 GTi
- Vee Dub Nut
- Buggyholic
- Posts: 281
- Joined: 17 Mon Mar, 2008 6:21 pm
- Location: San Antonio, Tx
adam
![]() by Texasbuggys » 06 Sat Sep, 2008 9:59 pm
by Texasbuggys » 06 Sat Sep, 2008 9:59 pm
Lookin great!!!
Get your new short or long body, custom chassis, show cages, bumpers and accessories at http://www.texasbuggys.com
E-Mail Texasbuggys@suddenlink.net or call 361-218-6272
E-Mail Texasbuggys@suddenlink.net or call 361-218-6272
-

Texasbuggys - Buggyholic
- Posts: 1039
- Joined: 01 Sat Oct, 2005 9:30 pm
- Location: Victoria Texas
![]() by Aquabuggy » 07 Sun Sep, 2008 7:40 am
by Aquabuggy » 07 Sun Sep, 2008 7:40 am
Clean garage! Where is your stash of old VW parts?
Doesn't everyone VW parts stashed in every corner of there garage and some outside and some at there dads shop and some in the living room (just kidding about the living room there really in the dining room)
Doesn't everyone VW parts stashed in every corner of there garage and some outside and some at there dads shop and some in the living room
My name is Chris and well I'm a buggy-aholic
04 Aqua buggy - sold
72 Orange buggy - sold
72 Green longbody - aka Shrek http://texasmanxclub.com/bboard/viewtopic.php?t=1082
68 Manx - viewtopic.php?f=11&t=2509
04 Aqua buggy - sold
72 Orange buggy - sold
72 Green longbody - aka Shrek http://texasmanxclub.com/bboard/viewtopic.php?t=1082
68 Manx - viewtopic.php?f=11&t=2509
-

Aquabuggy - Buggyholic
- Posts: 942
- Joined: 02 Sun Oct, 2005 10:18 am
- Location: Victoria Tx
![]() by Vee Dub Nut » 07 Sun Sep, 2008 8:32 am
by Vee Dub Nut » 07 Sun Sep, 2008 8:32 am
Aquabuggy wrote:Clean garage! Where is your stash of old VW parts?
Doesn't everyone VW parts stashed in every corner of there garage and some outside and some at there dads shop and some in the living room
I have a bunch on the shelves to the right of the pictures, a few outside besides the garage, gas tank and seats in the office, and the hood and engine cage currently reside in the guest bedroom
My real collection is back home in Columbus at my parents place.. have lots of goodies over there
Fightin' Texas Aggie Class of 2006
1967 Beetle
19?? Buggy (Someday hopefully... unless I sell it too LOL)
2000 GTi
1967 Beetle
19?? Buggy (Someday hopefully... unless I sell it too LOL)
2000 GTi
- Vee Dub Nut
- Buggyholic
- Posts: 281
- Joined: 17 Mon Mar, 2008 6:21 pm
- Location: San Antonio, Tx

![]() by blackthree4me » 07 Sun Sep, 2008 5:02 pm
by blackthree4me » 07 Sun Sep, 2008 5:02 pm
one of the best tools I think you can buy would be a bead blaster of some sort
it makes quick work of nasty things
it makes quick work of nasty things
if it aint broke, break it then fix it
-
blackthree4me - Buggyholic
- Posts: 631
- Joined: 12 Wed Oct, 2005 1:13 pm
- Location: Spring TX
![]() by Vee Dub Nut » 07 Sun Sep, 2008 6:39 pm
by Vee Dub Nut » 07 Sun Sep, 2008 6:39 pm
blackthree4me wrote:one of the best tools I think you can buy would be a bead blaster of some sort
it makes quick work of nasty things
Yup that's on the list for someday too.. LOL
Fightin' Texas Aggie Class of 2006
1967 Beetle
19?? Buggy (Someday hopefully... unless I sell it too LOL)
2000 GTi
1967 Beetle
19?? Buggy (Someday hopefully... unless I sell it too LOL)
2000 GTi
- Vee Dub Nut
- Buggyholic
- Posts: 281
- Joined: 17 Mon Mar, 2008 6:21 pm
- Location: San Antonio, Tx
118 posts
• Page 3 of 3 • 1, 2, 3
Who is online
Users browsing this forum: No registered users and 39 guests