intro and project

Show us your project. In progress or finished!

Moderator: Ken

intro and project

Postby trintek » 28 Fri Dec, 2007 2:17 pm

Hello all, new to the forum, name is trinity. have been driving, building, and wrecking volkswagens for almost 15 years. my brother and i have had 3 beetles, 2 super beetles, a karmann ghia, a vw thing, and one manx that never ran, and that i never should have sold.

i picked the one below up for 400 out in kerrville.. was told it last ran 4-5 years ago, they tried getting it to run after purchasing it with no luck, system is 6 volt at the moment. my brother, a friend of mine, and i worked on it for about an hour last weekend and got it to fire up for a few seconds, just waiting on the alternator and mount to arrive now so i can start the conversion.

Image
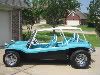
Side view with the vw thing tires on it
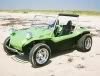
Image
angled front view

Image
engine area

still haven't found a vin on this thing, so am probably going to buy a titled parts bug and just go with that for the base.

current plans are:
convert engine to 12v and get it running reliably
repair rear passenger pan
complete rewire and 12v conversion
fiberglass work (no experience here, so should be fun)
mod an existing bolt-in cage to fit the interior, fab an engine cage

am either going to paint it yellow and black with tonka logos, or faux chrome and black, found a nice almost mirror finish silver spraypaint when i was working on a 63 ford truck restoration. at some point, will need to figure out what to do about seats, have been considering grabbing a set of jeep cherokee seats since the slides just bolt into place.

enough rambling for now, good to be here, and hope to meet some of y'all when i get this project street legal :)
User avatar
trintek
Buggy Dude
 
Posts: 9
Joined: 28 Fri Dec, 2007 12:35 am
Location: terlingua / san antonio

Postby Duner » 29 Sat Dec, 2007 8:21 am

You might want to skip the jeep cherokee seats as they are probably to wide to fit the buggy. If I remember correctly - 19"or 20" is about as wide a seat that you can fit into the manx style buggy. I will check my son's comanche (cherokee pickup) later today and take a measurement. I grabbed a pair of nissan pulsar seats out of the wrecking yard for my project and they are to wide to fit the buggy body.
Duner
Buggy Nut
 
Posts: 50
Joined: 21 Sat Apr, 2007 10:33 am
Location: Houston

Postby trintek » 29 Sat Dec, 2007 2:05 pm

darn, was hoping those would be narrow enough, guess it's back to the drawing board on that portion. may just take a tape measure and hit one of the local junkyards, walk around for a day or so and see if i can find anything that might work. one of those times i wish i still had the seat set from my old fiat x19.
User avatar
trintek
Buggy Dude
 
Posts: 9
Joined: 28 Fri Dec, 2007 12:35 am
Location: terlingua / san antonio

Postby Bill K » 29 Sat Dec, 2007 10:03 pm

Howdy Trinity. It's always great to have new people join our group.
Duner is right, it takes a narrow seat to fit a buggy. I found a pair from a '95 Pontiac Sunfire, and they fit great. Fiero seats will fit also, but they may be harder to come by.
Dream It - Plan It - Build It
User avatar
Bill K
Buggyholic
 
Posts: 2168
Joined: 06 Thu Oct, 2005 8:08 am

Postby trintek » 30 Sun Dec, 2007 1:23 pm

figure what i will do is make a list of likely candidates (sunfire, fiero, x19, etc), take a rail measurement on the existing pan, and a measurement from rail to tunnel, then head out to roosevelt auto salvage someday soon. luckily for me, the gf has decided to buy me a set of seats for my bday >:)

the new alternator, mount, etc showed up a day or two ago, so will work on getting that put in sometime this week. today is probably going to be spent stripping anything useable off of a 65 donor bug i picked up yesterday.
User avatar
trintek
Buggy Dude
 
Posts: 9
Joined: 28 Fri Dec, 2007 12:35 am
Location: terlingua / san antonio

Postby trintek » 07 Mon Jan, 2008 12:27 am

well, figured it was time for an update...
finished converting from generator to alternator, hopefully will have it running this week...
the cage in the donor bug needs some minor mods, but should work great in this one...
took the time to clean the doghouse, fan, cooling fins, etc while i had everything apart and soaking in pb-blaster...

ended up selling the front and rear window from the donor for 20 bux, traded the doors to someone for two highback pontiac bucket seats with rails... so one less thing to scrounge around for

tomorrow i am going to start rewiring the ignition and charging system... putting all the rest of the wiring off until i have the engine purring..

a friend donated a spark plug anti-fouler, a quad prong platinum plug, a coil, some wire, and a propane delivery system for the exhaust flame mod (still a bit down the road)...

it's getting there, slowly but surely :)
User avatar
trintek
Buggy Dude
 
Posts: 9
Joined: 28 Fri Dec, 2007 12:35 am
Location: terlingua / san antonio

Postby staggerwing » 07 Mon Jan, 2008 9:30 am

Welcome to the club Trinity! This is a great place to be and the buggy disease is well-supported here by some top notch experts on the subject! I live in Seguin, work in San Antonio, and am almost done with my first buggy build and am having the time of my life with the project.

and a propane delivery system for the exhaust flame mod


Haven't seen anything about "propane delivery systems" posted in the short time that I've been here, but it sounds like a real hoot and I'm looking forward to seeing it work! I'd really like to know what a "spark plug anti-fouler" is and am going to Google it as soon as I sign out.

Good luck with your build and please keep everyone posted. We really like to see build photos!

Staggerwing
Last edited by staggerwing on 28 Mon Jan, 2008 1:50 pm, edited 1 time in total.
User avatar
staggerwing
Buggyholic
 
Posts: 641
Joined: 16 Fri Jun, 2006 10:54 am
Location: Seguin, TX.

Postby trintek » 26 Sat Jan, 2008 12:49 pm

welp, here's an update:

engine was running, but oil cooler was shot. one of the guys at the vw san antonio club gave me an oil cooler. i installed it, drained the sludge, removed the screen, cleaned the sludge out of it and the valve covers, poured gas in the oil filler and let it set for 20 mins to loosen up the crud, then flushed it with a quart of oil, filled it with 2 quarts sae 40, and 1 quart atf. ran it at low idle for 40 mins, drained, cleaned valve covers, cleaned screen, put everything back together and filled it with 20w50, it's now running great.

i just put in an order through northern for a 100' spool of 16g 4 conductor trailer wire, am going to be using it for the base of the new harness, yes i am using heavier gauge where required.

went to a couple of parts america / advance auto parts stores and started picking up other needed parts.

here's the current idea of how the wiring will be done, still working it all out.. but if anyone has any thoughts, criticisms, etc.. feel free to post them.

1 universal off/run/start switch
1 fuse block - always on
1 fuse block - switched on (run.acc)
1 30-amp relay: low beams
1 30-amp relay: high beams
1 30-amp relay: starter solenoid
1 30-amp relay: horn
3 30-amp relays: switched fuse block

universal start/run/off switch
power direct from battery
run position to 3 relays on switched fuse block
start position to starter solenoid relay

starter solenoid relay
power source direct from battery

switched on (run/acc) fuse block
6 fuse positions
power via 3 30 amp relays (redundancy)
1) starter solenoid relay activation source, coil, fuel pump, electric idle cutoff
2) high beam relay power source
3) low beam relay power source
4) turn signals, wipers
5) horn relay power source, brake lights
6) unused

always on fuse block
6 fuse positions
power direct from battery
1) parking lights
2) hazard lights
3) 12v accessory outlet #1
4) 12v accessory outlet #2
5) unused
6) unused
User avatar
trintek
Buggy Dude
 
Posts: 9
Joined: 28 Fri Dec, 2007 12:35 am
Location: terlingua / san antonio

Postby Don » 26 Sat Jan, 2008 8:47 pm

if anyone has any thoughts, criticisms, etc.. feel free to post them.
Well, it seems pretty complicated and expensive and you'll have a tough time finding a home for all those relays and fuse boxes.  If you look at old VW wiring diagrams they are fairly simple.  Here's one from a '67 Beetle:

http://www.thesamba.com/vw/archives/info/wiring/bug_67.jpg

Keep in mind that everything is going to get soaking wet at some point. Anyway, just a thought, in the end do what's right for you.
User avatar
Don
Buggy Nut
 
Posts: 180
Joined: 06 Mon Aug, 2007 7:55 pm
Location: Pearland

Postby Aquabuggy » 26 Sat Jan, 2008 9:47 pm

Ive used this on a couple of buggy's. http://www.mooreparts.com/store/product ... G-HARNESS/
Some people will tell you its cheap and fuse block is crappy but its simple and has worked well for me, it also comes with a simple wiring diagram.

Wow :shock: the price has really gone up the last one I got was 40 bucks.
My name is Chris and well I'm a buggy-aholic

04 Aqua buggy - sold
72 Orange buggy - sold
72 Green longbody - aka Shrek http://texasmanxclub.com/bboard/viewtopic.php?t=1082
68 Manx - viewtopic.php?f=11&t=2509
User avatar
Aquabuggy
Buggyholic
 
Posts: 942
Joined: 02 Sun Oct, 2005 10:18 am
Location: Victoria Tx

Postby ckolek » 27 Sun Jan, 2008 8:39 am

i purchased a painless wiring harness for the buggy 300 bucks, i ended up using the harness Aquabuggy refered to for i think it was 40.00 it was much more simple and works great....painless harness will be used in the wifes baja.
User avatar
ckolek
Buggyholic
 
Posts: 259
Joined: 18 Mon Sep, 2006 11:08 am
Location: houston texas

Postby GregR » 27 Sun Jan, 2008 9:48 am

I have a Painless fuse box and did my own harness. From what I've learned over the years, I might rewire it someday and try something like this http://www.hotrodwires.com/12Circuit.html more than I'd need but looks like a good setup.
He's in Garland, TX.

PS I used 14 ga outdoor extension cord for the headlight runs. 3 wire and weather proof :D
GregR
User avatar
GregR
Site Admin
 
Posts: 1335
Joined: 20 Tue Sep, 2005 9:47 am
Location: North Texas

Postby trintek » 27 Sun Jan, 2008 12:02 pm

don:
not too expensive really
universal ignition: 8.98
atc fuse block: 7.97 each
optronic 30 amp relay: 3.97 each
100' 4 conductor trailer wire: 24.95

plus, wiring and electrical is the one area i am ok spending a bit extra. complicated, true, very true... finding a home for it isn't bad, mounted the fuse blocks, a grounding plate, and 4 of the relays to a piece of wood last night, will probably just epoxy it in place when done. the soaking wet bit is a major concern though. originally i was going to hinge the piece of wood and have it fold up and lock in place to keep it as dry as possible, i think a friend of mine has a vacuum table though, so may see if he can make me a plastic cover for the entire piece.

aquabuggy & ckolek:
i actually saw that harness and a similar one on ebay before i started laying out this one. the only reason i passed on it is, for a little extra i am getting a lot more. i know it's best to keep things simple, but at some point i will be adding auxiliary lights, gps, maybe a car-pc, sound system, heater, etc. in the end i would have had to install a second fuse panel and another run of power wire.

gregr:
good call on the extension cord, and solves the weatherproofing issue i was about to have with the headlights. i still need to get the buckets off, sanded, and painted.

general:
one of the main reasons for the amount of relays and in return the amount of complication is... at a later date i plan on setting up an asus eee or similar micro laptop to control most of the relays. true, it's overkill, but i leave my vehicles sitting in a desert when i am on road trips, i really don't want this one stolen.. the security ideas so far are:
removable steering wheel
shift lock
battery cutoff switch
battery isolator, 12v lawn tractor battery to alarm system
alarm system with microwave sensor, 1 main siren, 2 piezo pain generators
and at some point, removable relay controller... removing the laptop will effectively remove everything on the switched fuse block.

so unless someone can either get a flatbed out to my land (much easier said than done), or completely rewire the thing, they will be sol.
User avatar
trintek
Buggy Dude
 
Posts: 9
Joined: 28 Fri Dec, 2007 12:35 am
Location: terlingua / san antonio

Postby jspbtown » 28 Mon Jan, 2008 9:11 am

A relay works really well for the auto-park circuit on the wiper.

I am also wondering why a relay for both hi AND low beams? They don't draw at the same time. Wouldn't it just be better to have one relay for the lights?

Why relays to source your switched power? Seems like alot of wires coming off the key when all you need is one to feed the block. The fuses protect from overload.

Your security system sounds imposing. However, all it takes is one wire from the battery to the coil to get it running (pop start or jumper) and there aren't alot of places to hide the sirens so quick cuts will take care of them. Steering wheel removal is probably all that is needed.
jspbtown
Buggyholic
 
Posts: 250
Joined: 26 Wed Dec, 2007 9:57 am

Postby trintek » 28 Mon Jan, 2008 1:35 pm

relay for both high and low beam because the switch i am going to use has a passing light function, and the program i am coding for the relay control board will have high / low / passing / high+low

there will still only be one wire coming off the key. the wire from run/acc goes to a splitter at the fuse/relay board to switch the relays on. as far as one to feed the block, my ignition switch is rated at 15 amps passthrough, so my choices were to feed the block from the key, or feed the block via relay from the battery.

loads of places to hide a siren.... my hood doesn't open, so the siren, alarm module, and small 12v battery will go in there.. piezo sirens are tiny and can go anywhere, so most likely will place them deep in the footwells facing the interior, or will fab up some sheet metal covers and mount them in the floor under the seats. as far as steering wheel removal being all that is needed... that may be true, but i have driven a few cars without a steering wheel... not that hard really if you have vice grips, a plumbing wrench, or just about anything else that will lock onto the shaft. plus, removable steering wheel doesn't do much to warn people away from the stereo, lights, speakers, or any of the comm gear... i'd rather be woken up in the middle of the night by the alarm than give a potential thief hours of noise free working time.

as for the auto park circuit... any idea what goes where? i found out my replacement wiper assembly is 6volt as well, so am just going to use a voltage drop.. the current wiper is setup with a ground and one power wire to a toggle switch, was going to either use a relay for the autopark or an spdt switch... worst case scenario, i guess i can always add a momentary switch and park it myself.
User avatar
trintek
Buggy Dude
 
Posts: 9
Joined: 28 Fri Dec, 2007 12:35 am
Location: terlingua / san antonio

Postby jspbtown » 28 Mon Jan, 2008 3:02 pm

For my wipers I use a simple on/off switch. 87 terminal (power when switch is on) on the relay goes to low speed power supply on the wiper, and then the 87a (power when switch is off) on the relay to the auto-park terminal on the wiper.

This gives you only one speed, but who needs two on a buggy?
jspbtown
Buggyholic
 
Posts: 250
Joined: 26 Wed Dec, 2007 9:57 am

Postby trintek » 28 Mon Jan, 2008 3:43 pm

sounds like a winner, will check to see if the auot park circuit on my assembly is working, i know the one on the replacement assembly is toast
User avatar
trintek
Buggy Dude
 
Posts: 9
Joined: 28 Fri Dec, 2007 12:35 am
Location: terlingua / san antonio


Return to Member's Projects

Who is online

Users browsing this forum: No registered users and 7 guests